Showing posts with label DIY. Show all posts

Saturday, February 7, 2026

Go In Peace and Love: 2025 Reflections

I am delinquent to my usual annual review of my year. I'll blame it partially on the fact that I've caught up on making video montages for each year, and I spent much of my computer time towards the end of 2025 on creating my video, which is great. Also, I can partially blame it on a happy thought that I was just more excited to look forward and doing things, creating my story, rather than just documenting it. So I don't feel bad. Sorry, not sorry! That being said, I think there are a few really impactful things from 2025 which I would be remiss if I neglected to put into words before the memories and feelings fade completely. 


Resolutions for 2025

I set out at the start of 2025 to do some specific things which I pivoted away from, specifically around how to publish my book, and leveraging technology specifically for investing. I did publish a book, self-published rather than through a real publisher, and not the book I intended to publish - that one is still TBD - but a totally bizarre diversion from my usual writing. And it was fun! And it used technology in ways I hadn't imagined at the start of 2025. So while I didn't accomplish those specific things, I did my own thing, and isn't that really the point, anyways? 

What I did do which was aligned to my initial outlook for 2025 included dance. I performed two final performances with the Jubilee Dance Team before the group dissolved. I continued dancing socially and had probably my best Camp Hollywood yet, sharing it with a fellow engineering friend and feeling overcome by the sheer joy of the people there who are just there to dance. I know drama and political posturing exist in those groups, but I was largely immune to them, so all I saw was sheer joy for five days. And it occurred to me - shouldn't we always strive to have days like these? Even if not every day is joyful, finding days like those make the hard stuff worth it. What a revelation and privilege! 

I also set out to finish my family room and primary bathroom, and those I did and I love them. My bathroom, especially, is everything I dreamed it to be and gives me joy every day I get to wake up and use it and every night as I brush my teeth and get ready for bed. I am REALLY proud of my faux living wall made with craft supplies. It is the perfect proportion I was after, and it just feels right in that space. Home improvements, especially crazy ones, don't always work out so well, but the careful thought and planning and design iterations I toiled over paid off in this case, and that is amazing. As my friend Rachel said about it, "It's just so you!" And that's right. It's not for everyone, but it was never meant to be. It's my house, my castle, and my sanctuary. It may deteriorate my resale value, but I'm not selling right now, I'm living (here) right now. More of that, please! 

Life List #35 - Visit a concentration camp

From my Life List, I checked off one very important one to me: visiting a concentration camp. And I did it in the best way possible - with my sister, Christy, with whom we've shared book recommendations about the concentration camps and Jews during the Holocaust. The trip idea formulated out of my business trip to Milan, a city my sister strongly desired to visit. She decided to join me my last week there, and use my hotel room as a launch pad from which to explore Milan while I wrapped up my work there. Then, we considered going somewhere together - Greece, maybe, or back to Venice, a city we explored together for the first time years prior, with great memories. But when I suggested the more serious idea of going to Auschwitz, she was excited in whatever way is appropriate and not weird. I had heard that Krakow, Poland was a lovely city, but I just assumed that was something people said because what else do you say about the nearest major city to a place with such a devastating past as Auschwitz. I was wrong in all the best ways on that. 

It was a short flight from Milan to Krakow, but something changed when we arrived in Poland. Everything seemed happier, easier, safer, friendlier, better. Just better. I can enumerate ways but the parts don't seem to account for the whole, fluffy, happy feeling I had there. And I wasn't alone in that. Christy also seemed to love absolutely everything. We were so uncanningly happy in this town in which we didn't know the local language and barely understood the food. 

It started, I suppose, with the Uber ride to our hotel. The houses in the countryside were tall and boxy and somehow the most adorable houses I've ever seen. Like, I wanted to take a picture of every one of 1000 houses I suppose we passed. I would happily live in any one of those in a heartbeat. Turning into Krakow, a giant castle-like complex built of red brick greeted us. We later learned this was some utility company like a water works or something like that. What?!? 

I had booked the hotel with my excessive points, so it was free of cost to us, but they greeted us like VIPs maybe because of my status anyways. The woman who checked us in offered to make dinner reservations for us at the hotel's restaurant, and since we were sort of tired and unsure of going out on the town, we opted in. So after getting settled into the room, we prettied up a touch and headed downstairs. She escorted us into the restaurant and told the waiter to take special care of us. She even came back after we were seated to offer us a special Polish treat - she cautioned that half of Polish people love it and half don't care for it. My sister and I were also split right down the middle, I loved it and she didn't care for it, so I gladly enjoyed the half of hers she didn't eat. We ordered wine but the waiter offered us a complimentary shot of a special Polish liquor. We cheers'ed and gulped it down - it was pleasant but not our thing. The chef sent out a special small palate cleanser compliments of the house. Our appetizers and meals were all scrumptious and presumably authentically Polish. Who knew I liked Polish food so much? I certainly did not. After some equally delicious desserts and cocktails, we stumbled (from the food coma more than the alcohol) back into the elevator and passed out. 

Now, I will add that while my sister and I do have real empathy for the persecuted Jews of the Holocaust and are inspired by those stories of absolute resolutions to survive, so much so that we shared many of these stories between us, we also have a sometimes dark sense of humor. Comedic relief has been a way of coping with death and tragedy in our family, and making light of ugly situations is sort of what we do. So we knew we had to clean up our act out of respect while touring the camps, but boy did we let it loose before and after. 

The first thing I recall from our tour of Auschwitz-Birkenau was a constant feeling of having been here before. Not quite déjà vu, like I had lived this tour before, but more that everything made sense, I knew what to expect, it looked like I… remembered? It could be the effect of having seen pictures in various books, museums, video footage, internet articles, etc. I wanted to write it off as that. But the feeling was of such familiarity it was hard to write it off. It felt like I was remembering the images through the accounts I had read, as if I had lived those accounts myself, and now I was visiting the places I had visited before in my mind. That alone was a very moving and somehow comforting feeling - that the accounts were so accurate they felt like a memory to a first-time visitor, and all the more hope that such accounts will stand as evidence of the crimes that really happened and a hope that the human race will not go to such depths again. 

As a mere mortal, I think it is often hard for me, and probably most people, to comprehend large numbers. The individual accounts I had read over the years were painstakingly awful, but to imagine that those atrocities, or worse, since most didn't survive to tell their tales, to millions of people just can't be fathomed. If I read a thousand individual stories, that still would represent only a tiny fraction of the stories not learned. So I really appreciated some of the exhibits that attempted to show these magnitudes in ways we could come closer to comprehending. There were locks of hair that had been shaved off the prisoners upon arrival - most of which had been taken to factories for use in manufacturing - but even what remained was still an unbelievable amount. The shoes stripped of the prisoners, some plain and practical, others decorative and fashionable, all thrown together in a heap that still only represents a fraction, but imagining the pairs of legs belonging to people who boarded the trains and arrived to these horrors, the comprehension of the magnitude was more within reach. Then you turn the corner and witness a pile of kids' shoes - and that evokes a heightened emotion for so many reasons, as we continued to strive to comprehend. 

I also appreciated the visuals of the Cyklon B used to gas the Jews and other victims, and the models of the facilities, and the like. There was a scientific efficiency in the Nazi extermination efforts, and understanding the mechanics is a part of the equation to comprehending the horrors that occurred there, which the accounts tend not to know or detail.

At Birkenau, we had the opportunity to lay eyes on the buildings in which the prisoners were forced to attempt to sleep, many to a single bunk, and the bunks piled high and packed into the tightest of quarters. One could imagine the ease with which disease could spread in such conditions, the restlessness one might struggle with hearing the coughs, moans, cries and other human noises of so many people shoved together, and the utter exhaustion they must have felt to find some kind of comfort and solace in being in here, able to get off their feet and not be laboring, and maybe finding some warmth however slight. Much of it rendered me just speechless. 

Entering the gas chamber was downright unnerving. I knew I was safe, and yet… 

I don't ever want to do that again. I suppose most people don't. 

While the exhibits at Auschwitz helped me try to comprehend the magnitude of the human element, the vastness of Birkenau spoke of a killing machine that was still ramping up. I don't know what the Nazis would have accomplished had they not been stopped when they were, but it seemed like it could have been magnitudes worse than the already incomprehensible disaster it was. 

The end of our tour tied up with some reflections that these were fellow humans that did this to other humans, and that we need to remember so that we never repeat such atrocities. Capturing these quotes in photos and souvenirs was almost as important as visiting the place itself. 

As we headed back, we were mostly quiet, but I had to chuckle to myself at the playlist, which included, "I Want to Break Free," "Shotgun," "Rude," and "bad guy," as if the world was trying to lighten the mood with some comedic relief. Also, perhaps because I was too emotionally drained to care what people might think at that point, or maybe to fill my photo folder of something happier, I took a bunch of pictures of the adorable houses on our way back to the town. 

That afternoon, my sister had a few fun destinations she wanted to check out. We headed first to EL&N and had fun drinks and food there. Then we played around in the Be Happy Museum which was full of silly photo ops to be hilarious in. Around town, we found a Christmas store (we love that!) and heard a trumpeter play from the turret, which is just so right up my alley if you know my love of turrets and history of trumpet playing. We found ourselves double fisting drinks for some reason at whatever bar we landed at, and just genuinely enjoyed every moment of our short stay in Krakow. By the end of the day, we were devising how we could move to Poland. I've never loved a city so much in a country I knew so little about. 

Life List #33 - See the brilliance of the Milky Way

I revised my Life List at the beginning of 2025, and one of the newly added items was my pursuit of seeing the Milky Way in all its glory - as it had eluded me several times while visiting dark sky parks known for their glorious views of the night skies. Perhaps adding it to my Life List helped to make it happen, or perhaps my doubling down on my pursuit because I added it to my list is what did it. Either way, I was overjoyed to take in the views at the top of two different mountains in Hawaii, capturing beautiful photos and finally feeling satisfied by the view with the naked eye -twice. I wrote about that adventure here.

Other Life List-worthy Mentions

In addition to checking off two new things from my Life List, I doubled down on a few others. Self-publishing my book about Astoria was a second hit on #15 to Publish a book. I also had the opportunity to see a proper opera at the Syndey Opera House (my Life List called for seeing a "show" which I had done years before, planning the trip around a Postmodern Jukebox concert), to improve upon my #132. A trip to Hawaii is hardly complete without a luau, so I did #75 for a fourth time in 2025. 

As the Winter Olympics kicked off yesterday with the focal point in San Siro Stadium, seeing the stadium and the sites reminded me of how cool my time in Milan was. It feels like a decade ago, but it was just March that I spent a full month in Italy for work, during which my employee and I got to catch a soccer match at that same stadium. I had also toured the Duomo in December 2024, which featured heavily in the Olympics introduction as it is such an icon of Milan. I had visited Lake Como on both trips, but in 2025, my employee and I went to the spot where a Star Wars scene took place - the one in which Padme marries what's his face. It was beautiful! 

While I love taking pictures to help capture the amazing memories, sometimes the picture is missed, or is insufficient, so the moment needs to be remembered in other ways. After working in Australia for two weeks, Sam and I spent a few days back in Tasmania - a place even Australians rarely go once in their lifetimes, and this was our second time there. A moment I wasn't quick enough to capture in photographic proof was when a kookaburra perched on the railing of our house's deck. It was right there! And if you don't know what a kookaburra is, go google it real quick because they are the coolest looking bird in the world! They make a hilarious sound, like a monkey laughing, which we heard throughout the weekend there, but that was the only one we actually saw. What we did see a lot of were pademelons, a type of animal only found in Tasmania and of which we were not familiar previously. There were pademelons and wallabies all over the property of the house we rented. Unfortunately, they only came out at dark, so when we turned off all the lights in the house and stood on the deck long enough for our eyes to adjust, we could make out the shapes and the jumping motions, but the camera was rendered useless in capturing the sight. 


Honorable Mentions 


What else did I do in 2025? Gosh, it was really a full year, looking back. I started the year in Australia, so literally day 1 found Sam and I traveling from Hobart to Sydney, where I settled into the most amazing room at the W overlooking Darling Harbour, with its Saturday night fireworks. I went to the local Lego store which happened to be the world's largest Lego store, how I didn't realize that earlier is beyond me. Sam and I saw Hamilton in Sydney which gave me a unique perspective - actually there is a different caliber from what I was used to on Broadway compared to the Sydney show. Back home in Texas, I saw other musicals, including & Juliet, Mamma Mia, Waitress, The Outsiders, Beauty and the Beast. I went to the Fort Worth Zoo and also the Dallas Zoo for both daytime animal viewing and holiday Zoo Lights, and toured the fun (but very cold) ice sculptures based on the Elf movie at the Gaylord Resort in Grapevine. 

My sister in Tucson continued recovering from her medical issues, and it was great going out to visit and spend time with the family. 

Sam and I tried Pickleball at my local park, which was neat - until his strong man strength broke the cheap racket I had bought him. 

My parents visited for a mercifully short stay and we got to visit with my aunt and uncle just a couple hours south - well-timed, too, because my uncle passed just a few months later. When I learned the news, I put together a little video montage using some old footage of him and my Dad from their childhoods, and then added pictures from their young adult lives and more recent memories. I put it to the music of a male-sung cover of the "For Good" song from Wicked. I was really proud of that montage, and when I sent it to my Dad, he said it helped him finally to cry, which made me happy to be able to have helped him process his brother's death. 


I reconnected with my old MBA friend, Rachel, who lives in Waco. Talking at length with really smart people is so inspiring to me, I need to remember to do more of that.

I visited my sister in Raleigh, and we did a fun hike and went to a piano bar for tipsy hilarity. At App State, I got to do a shot with my nephew and his roommates, and take him and his girlfriend to the football game. 

My former dance instructor from Arizona came out to Texas for work and we got to catch up and go to a dance on two separate occasions. 

I finished the year in Tucson for an extended stay with my family. The kids surprised me with a trip to the observatory which was a great highlight. While wrapping up with a lunch picnic, one of the volunteer docents sat with us and in our conversation, he commented that I'd "make a really good docent," which reminded me of the joy I got from being a docent at the Poppy Reserve in California, and made me consider looking into something similar in Texas, even if it is Texas. 

I pursued my dream of owning land in Florida, carving out a fun extended weekend for myself there, falling in love with one particular property, and buying it. 

While working in Georgia, I got to see some F-22 and F-35 flybys and an F-22 launch, and I attempted to go swing dancing only to discover it was a West coast place, and tried it anyway. 

I also got to swing dance in Sydney when I went back for work, which was so much fun! 

While working in Australia, we had lunch right by the runway one day and got to watch the F-35s do touch-and-go's. 


All in all, I had a busy work travel schedule in between which (or sometimes extending and amending off those trips) I managed to take some really amazing vacations, do a ton of dancing, nerd out on airplanes, make some happy spaces in my house, and most importantly, spend time with friends and family I love. One of the most interesting parts of the Blue Zone theories and the Outlive book and the futuristic views being presented is that in all things, the importance of relationships of all kinds is pivotal, key to survivability and longevity and happiness, and only growing in importance. So this has been a focus of mine to reach out more, connect more, and appreciate more. And when I looked back at 2025, even though the romantic relationship I hoped would be my forever one didn't work out, I feel so blessed to have lived with intention, joy, and connection throughout. 

Go in peace and love. 

Friday, May 30, 2025

From Lone Star Drab to Love Island Fab: Another Dream Come True


As a sort of follow up to my recent post, "Follow My Florida Dreamin'," I want to also share another way I followed a little dream to a happy trigger that keeps on giving. Specifically, my primary bathroom and bedroom. When I looked at houses in Texas for my relocation last year, I gave each house a nickname, many of which were hilarious to my realtor (and I happen to agree). There was "My Castle" which was the giant house with a turret, but when I saw it, the houses across the street put its turrets to shame and I ended up renaming it to "My Doll House" because it looked like a life size doll house. The house I really wanted was a very modern, Asian-esque model-perfect house with a pool, hot tub and backyard about which I still dream - with its pool ledge and modern appeal. But, they didn't accept my offer and it may be for the best for two reasons: the commute would have been significantly longer and more annoying (nearly impossible to avoid multiple school zones), and, I would have been incredibly reluctant to customize it and make it my own, because it was so stylish the way it was, just not exactly the styling I was considering. The house I ended up buying, I had nicknamed, "Just Ugly Enough," because it had good bones and was in a lovely neighborhood, but I absolutely hated the colors of the interior. That is actually a benefit, to me, because if I hate it, then I have no qualms about painting over it, and it was only cosmetic work that needed to be done to make my own, nothing structural or otherwise significant.

So "Just Ugly Enough" became my new home a year ago, and between work travel, personal travel, and just not wanting to unpack boxes and whatnot, it took me a little while to finally start getting my home into the style and color schemes I wanted. To be fair, there was another, more direct reason for my delay - I had mocked up several variations on my laptop, but I was nervous about the bold colors and concerned they'd be too much. Finally, I decided I just had to push forward. I was happy enough with the latest mockups, and it was just paint, right? If I absolutely hated it in a few months, I could always redo it. It would be a pain, to be sure, but, as a recent meme said, "Everything is figureoutable."

I started slowly but with commitment - attacking first my huge, imposing fireplace with bright pink paint. I worked on it steadily but only as I had time. Even before the painting was complete, I could tell I loved it! The part of the fireplace that had been painted looked so good. I kept going. I painted the mantel and hearth a light gray to tone down the pink. When it came to the cabinets, I was thinking blue, but hadn't quite settled on the specific shade, so I taped the paint swatches of the leading contenders up to the cabinets so that I could see them in the exact light throughout the day that the actual paint would be in. I finally determined which one I liked the most and got that painting done.

Moving onto the primary bedroom and bathroom, I pretty much was set in stone on what colors I wanted in the bathroom, but again was nervous because it was, well, a lot. I struggled with what I wanted to do with my room, though, because I wanted it to match, but I also didn't want it to be too much. Weirdly, for me, I settled on painting over the ugly greyish blue with a plain white in the bedroom, and then using accents to bring the color forward - pillows and bedding, and, neon lights!! At night, which is the best time to be in a bedroom, with the neon on and the regular lights off, it has exactly the look I wanted without
being crazy. The other thing I really liked in my room was that I ended up repurposing a tall glass cabinet that had previously been used to display movies, and I made it a display case for my various feminine accessories - necklaces and rings, my various Coach purses, and a few tokens and nicknacks. It became a functional storage in the disguise of a fashionable display case - maybe borrowing a little inspiration from the Barbie movie or the Barbie Dream House design challenge on HGTV.

The bathroom, though, is my prized room now. It is exactly right in so many ways. Prior to painting and adding wall décor, I had been collecting various accessories to match the theme I was aiming for. A fancy pink and gold picture frame that has a call bell and the caption, "Ring for Champagne" sits on the window sill next to a little bubble bath container in the shape of a bottle of champagne and a hot pink rubber duckie with the face of a flamingo, because, obviously. A silly pink hand statue, originally on top of my medicine cabinet, was
relocated to the window sill. The corner shelving has my bath supplies - bath bombs, epson salts, shaving crème and razor, and a hot pink loofah to tie it together. On the medicine cabinet, I had these cute little pink containers for Qtips, hair ties, hair clips, swabs, etc. I found an adorable pink digital clock that I had originally placed on top of the medicine cabinets, but post-painting, it found its way to a white wall to create that contrast in color.

The problem was, all these cute hot pink accessories clashed with the baby blue wall color and the hideodeous hand stamping and those dated mirrors. It was time to paint! But that's a lot of work, so I hired someone. I put up post it notes on each wall to make it very clear which color would go where, and showed him. And thankfully, he didn't try to talk me out of the wild color design. He worked all day, but got both rooms done - so much faster than I would have!

The wall around the bathtub is a bright turquoise, and I changed out the white sheer curtains that were there for hot pink sheer curtains (which I had bought months in advance). I had changed the color of the chandelier in my mockups, but I ended up leaving it as the white chandelier that was there because it was a good contrast to all the color. On one wall, I created an artificial "living wall" with fake plants from Hobby Lobby. On the other wall, I have a neon sign that says, "Hello Gorgeous" which is a straight shot of visibility from the toilet, a great message to see as I start my mornings. The little toilet room, although without a door to actually separate the space, just a door frame, has the same bright turquoise color. 

The wall with the vanities is bright pink. Other than that, the other walls are white. The hand towels are turquoise, pulling in that color towards the pink vanity area, while the curtains pull the pink into the turquoise bath area. On the floor, bright yellow rugs of various sizes are arranged and often re-arranged by my cleaners, and honestly, the variety is kind of fun. Sometimes the long one is in front of the vanity to accommodate both sinks, other times it's by the bath tub and the wider rug is in front of my primary vanity.

The VOCs seemed to linger much longer than I anticipated, even with open windows and fans for several days. So I googled what plants were the best at absorbing CO2 and VOCs and invested in a few real living plants to help with the issue functionally, and bring some more organic décor into the space. Of course, I hate making new habits and I knew watering would be a pain for me, so I bought a few of those glass watering globes, but not just any, I bought hot pink flamingo shaped ones. I found another fun pink accessory - what looks like a little balloon
dog, but made of hot pink transparent plastic or something similar. And now, all the hot pink décor I had bought before finally makes sense.

I toiled over what mirrors to put over the vanities - I could put the old ones back up, but I just hated how they look, even though they do sort of match the cabinets. I thought about getting really fancy ones with LED lights. But in the end, I went with a very simple, modern look of rectangular mirrors with rounded corners. I hate to drill new holes for them and install dry wall anchors - previously my nemesis for some reason, but I have no idea why, these were actually really easy to install - and once they were up, I was instantly pleased with my selection.

Not everyone likes the room - my sister especially despised it. But luckily, she doesn't have to live here. And I absolutely adore it. The motif and colors were largely inspired by my favorite trash TV show - Love Island, and honestly, after picturing it and mocking it up over and over again, I don't think it could have turned out any better. I absolutely love it. And what's more, every time I walk in there now, I get a little tingle of excitement and giddiness and joy. Whereas I would almost feel depressed walking into that blah blue bathroom before, now the colors delight me and the wall décor feels like it was always there. It's literally like seeing a dream come true, albeit another smallish dream, but a dream nonetheless. 

It occurred to me that there was a book called, "Dunk Tank Pink" that had a multitude of anecdotes, including the one referenced in the title about how painting a jail cell a very specific color pink was statistically shown to calm drunk people down and reduce alcohol-fueled violence and incidents. While pink is not usually the color most people reach for to paint their bathrooms with, I wonder if part of my enjoyment is somehow related. Or, maybe I'm just embracing the feminine aesthetic being a strong, single woman. And it's not just pink. It's the whole Love Island vibe. A vibe I love!

I named my blog "Easily Thrilled" years ago because it struck me as funny or peculiar how certain inconsequential things in life could take my breath away and give me disproportionate joy. My bathroom, in the previously "Just Ugly Enough" house, in a state I don't love, is one of those things that gives me a little gush of joy every time I step into it. So my challenge, to you, dear reader, is, take the chance, buy the paint, use color unabashedly if that's what you want to do. Make it your own. Unless you're eminently selling your home, you're going to live there for a while, so don't worry about the resale value or what future buyers will think. They don't see your interior every day. You do. I'm a big believer in function over aesthetic, but once you have the function down, go big and bold with the aesthetic, the bigger and bolder, the better. So you can be easily thrilled, too.


Friday, November 29, 2024

An Invitation for a Princess: My Non-Traditional Thanksgiving Weekend

In recent years I've turned to non-traditional Thanksgivings for the holiday at the end of November, such as going to a Las Vegas buffet, or going to the beach. This year I made no plans to go home or to spend it with family. Earlier in the year I had hoped that Sam and I would get together but he ended up making other plans. My next idea was to use the long weekend to fly to Florida and scout out some properties to potentially buy. But after the recent hurricane, I started to shy away from that plan. Then I finally got the news from work that I'd be going to Italy for two weeks of training and collaborating on F-35s. This is an endeavor we've been plowing away at since the beginning of the year, so I am very ecstatic to see it coming to fruition. But it meant we would leave at the tail end of the Thanksgiving weekend. So rather than make crazy travel plans and stress myself out, I spent the long weekend at home, by myself, doing me things. I did some self care and I've finally been in the mood for DIY so I worked on my house (side note: it's simple, but I was very happy with a few installations of hooks in my shower, especially repurposing the failed sea turtle ukelele hook I 3D printed years ago into a razor holder - and the green and pink coordinates like Wicked were a happy accident). I sometimes joke that I work hard at DIY because I'm a princess and I want things exactly as I want them. DIY Princess - that might be a good title for my next design book.

Now, I am not usually a "me time" kind of person, nor do I usually enjoy spending time by myself. But after being ghosted by the latest potential match on the dating app, I am just so disheartened. I should also mention that Sam and I have rekindled a bit this month and I feel better than ever about our relationship. So while it's hard to be away from him, I'm honestly so into him that I'd rather be alone in between our visits than try to fill the gap with some local guy who just can't measure up to Sam.

To be fair, I did have a Thanksgiving day invite from a gentleman at work. We had been at a work happy hour the week before and I guess I must have said something about not having family here and not planning to go home for the holiday. I'm guessing he's a bachelor, too, by the way he phrased his invitation. Something like, "I was thinking I'd invite over people like you who don't have family to spend the holiday with; I could cook a turkey and make some sides and all of that. It may just end up being the two of us, though, I'm not sure who else might come." Is he interested in me? He's a nice enough guy I suppose, I don't really know him too well but when I hear him talk over the wall at work he sometimes makes me roll my eyes and other people have picked up on it and commented on it, too. And his stories just go on and on… yeah, probably best I don't give him hope or pursue anything with him, it would clearly only end in disaster and then awkwardness at work and work events.

Anyways, when I bought this house, I had christened it with the name of, "Just Ugly Enough" because it has good bones and a good structure, nothing structural really needed, but the color scheme is atrocious. That way, I don't feel bad splashing up my own, sometimes a bit "out there", color scheme. If it's all cosmetic work that's needed, then I can only improve upon it with some modern updates and fun colors.
Contrast that with the very sexy modern house with the amazeball pool and hot tub in the backyard. I still dream about that pool, especially the feature where you can put a chair in the shallow end and sit in the pool without being in the pool. That was my first choice of house, although the commute was terrible, the cost was higher and I felt there was little I could do without taking away from the aesthetic, even though I wanted to. But oh, that pool. And I very much miss having a hot tub, especially now that the temperature has dropped from 80 down to 50 literally overnight.

Alright, so "Just Ugly Enough" has needed a redesign and I've been playing with color schemes since even before I officially owned the house and moved in. But I've not been fully satisfied and convinced of my designs in both the primary bedroom and the main family room, the two areas I want to attack first. The kitchen is meh but it's okay. It's the family room I've really wanted to do something with, and my primary bathroom, but without knowing what to do with the primary bedroom, I've been hesitant to start on the bathroom. I also started to realize how inundating a big paint project is and how little I actually enjoy painting. I could hire someone, but that takes effort too. And even if I hire someone, the decision still needs to be made what color to paint in.
After hee-hawing for months, I finally decided to try to fit a close proximation of the color scheme I want to apply to the fireplace and built-in shelves and décor while keeping the main wall color the light boring beige that it already is. With that constraint in mind, I was able to come up with a design I was thrilled with. Oh yeah, I should mention, most of my winning designs and indeed the final design included painting my fireplace a nice shade of hot pink.

I slept on it for a few nights and then decided to commit to it. I put up painter's tape around the fireplace, and relocated the TV from its perch on the hearth. I pulled my paint color samples out and found the four best ones and put them on the fireplace to help me decide what exact color would work with the lighting in the room throughout the day. Having made my decision, I brought it to Home Depot the weekend before Thanksgiving and got a gallon mixed up. The name of the paint color was, "Invitation for a Princess." Using a roller, I painted the
majority of the fireplace. But, brick is tricky and the mortar here is very deep, so I quickly realized I'd have to go over it all with a brush or small sponge to get all up in between the bricks.

Having painted just the first coat and not getting in the mortar yet, I sat down to watch some TV and admired the color - I was in love! Once I started filling in the mortar, having considered not filling it in or perhaps painting it a contrasting color like white or gray, I realized making it pink too was the right call, and loved it even more. With such a bright color, adding pattern would only make it too busy and painful to look at, I think. Now, with the very tall ceiling I have in the main room, and the fireplace going all the way to the top, I knew painting at height would be an annoying challenge. I have plenty of ladders, that's not the problem. In fact, the ladder I ended up using the most was the one I bought to finish up my water closet in the Palmdale house - just a straight telescoping ladder, nothing fancy. But it is tall! And also, terribly uncomfortable to stand on at length. Hence, it didn't take long for me to tire of painting while on the ladder, my back writing in pain.

Leading up to Thanksgiving, almost out of the blue I decided I wanted to make homeless care packages and hand them out as part of my way of focusing on gratitude. So I perused Amazon, first just searching for homeless care packages, which there were plenty but a lot of it was about warm stuff like gloves and emergency blankets and beanies. I mean, it does get chilly here but I didn't think that should be the focus of the kits I handed out. I did get some other ideas from that search, though, and ended up buying in bulk the following: draw string back packs  (to hold the stuff), beef jerky packets, non-rinse bathing towelettes, and socks. Then I went to the store and bought Ritz with sectioned off sleeves and travel deodorants. I haven't been eating my protein bars lately in favor of lower carb foods, and seeing as they expired soon I thought those would be good to include. And I dug up my stash of hotel-provided mini soaps, lotions, shampoos, body washes and dental kits and mouthwashes.

As is so often the case, I may have been a bit ambitious with my holiday weekend. I had decided I also wanted to see the Wicked movie in the theater and wanted to get my pedicure and eyebrows did. Plus I wanted to do some programming, take a relaxing salt bath, practice my dance routine and workout, clean up around the house, finish packing for Italy and visit Old Chicago for lunch to have a cheat pizza I've been craving for three weeks.

Wednesday, the day before Thanksgiving, I thought that I might even finish painting the pink, or Invitation for a Princess rather, on the fireplace while the stores were still closed, so I opted to throw a couple samples of the gray I wanted for the hearth and the mantle, made a decision on which one was the best and got a pint of it. This was all just in case I finished and needed the next paint job to keep myself busy.

I ended up working late Wednesday evening and didn't make time to assemble the homeless care packages, so I did that Thursday morning while watching the Macy's Thanksgiving Day Parade. Then I took my extended glorious bath and booked tickets to see Wicked. I don't think I realized how long that film was - when I got out it was practically bed time but I hadn't yet distributed the homeless care packages. So I started driving towards the Stockyards and definitely came across a "target rich environment." I was nervous the first time I spotted a likely candidate and drove past, but  convinced myself to turn around and get the nerves. I realized I felt better handing the bags out my passenger window - more distance and less ability for someone to grab me, for instance. Homeless people are associated with a high rate of mental illness and PTSD. Once I handed out a few bags, I found my confidence and was able to easily find more people to give the bags to, until I was all out. Even driving away I saw a couple more people whom I hadn't gotten to. I started thinking more about what else I should include in my next round - maybe ear coverings wouldn't be such a bad idea. I made a list on Amazon but it wouldn't deliver before my trip to Italy so I didn't purchase them (yet). But I did make up a few more bags with the remaining supplies I had already, and was able to hand those out today while I was driving around for various things.

All in all, it was a pretty good Thanksgiving. But I think today, Black Friday, has been even better. I can't quite put my finger on why. I made sure to exercise and practice my dance first thing this morning after leaving a check for the pool guy in our usual lock box - I felt so guilty I hadn't done it the prior weekend I was having dreams about it! Then I got to painting - finishing up as much as I could bare doing the mortar / cracks in between the bricks. It was exhausting. Satisfied with my progress, while not totally complete it was about as much as I could do without moving the ladder and I didn't want to introduce the possibility of getting paint on my wall.

Those activities complete, I decided it was time to reward myself with a pizza at Old Chicago and a pedi/eyebrow waxing. The timing was intentional for the latter to be close to the Italy trip so I'd look and feel as fresh as possible. Finally, an idea struck me to get my sis some get well stuff - rather than sending her a bulky package when she starts chemo. Instead, I decided to go with Massage Envy gifts cards. Naturally, then, that meant I also needed to stop somewhere and get a "get well" card. A Target was the first applicable store I saw - oh darn, I have to go to Target - and I got the cards, but David was so freaked out I had too.  

Returning home, my recycling bins had been emptied, so I picked those up from the street. All in all, it was just a really good day for me. If only I could have more days off work with nowhere to go… kind of like an Invitation for a Princess.

Sunday, November 20, 2022

DIY Christmas: Stockings Sew Easy!


I am a little obsessed with my homemade stockings inspired by the movie, Elf. This was my first time making my own stockings and I was surprised how easy they were! 

Briefly, the steps I took:
  1. Fold the fabric in half and cut the shapes using a general pattern or reference, such that there are two pieces which are mirror images of each other. 
  2. Sew across the white fur on both "outside" faces of the fabrics. 
  3. Place the outsides facing each other and pin in place. 
  4. Sew around the sides and flip inside out when done - just like making a pillow! That way, my imperfect sewing is concealed inside, and all you see on the outside are nice seams. 
  5. Hot glue decorations - ribbons, belt, bows, etc. Highly recommend this instead of trying to sew decorations on. It seemed to work really well!

Since I had so much fun making these (and honestly, am really proud at how they turned out), I started brainstorming other designs I could make. Take a look at some of my other ideas!  


If you prefer the original Jovie color scheme: 

More "Elf" ideas (if you have more humans raised by humans):

...and some more because I just couldn't stop...


Okay, enough of "Elf", what else we got? How about stockings for Lego fans?  Get the fabrics here.


I've always adored the patterns from Moana! They could be turned into unique stockings for fans! Check them out in my Dress Up Time collection here.


Speaking of Disney, I plan on making a pullstring backpack with my Guardians of the Galaxy: Mission Breakout -inspired fabric, but it could also make a funky stocking!Or use some Tivan-style writing from the Obscure Writing collection.


While there are plenty leopard print designs out there, have you ever seen a giraffe print stocking? Me neither! That's one reason I started my "You Animal" collection - to bring more representation and variation to the animal print options!


The Pantone Color of the Year for 2023 hasn't been announced yet, but it is anticipated to be "Digital Lavender". You can be very fashion forward with these Digital Lavender patterns hanging from your fireplace this year!


Sunday, July 24, 2022

How To: Custom Curtains

One of the aspects of the "Long Tail" which the Internet and companies like ebay, Etsy and now Spoonflower ushered in is that there is almost no limit to the ability to find (or make) exactly what you want. In other words, if you can dream it, you can find it (or make it with relative ease). Taking advantage of this, I'm going to talk to you today about designing and buying or making custom curtains. Curtains are, I think, an underrated opportunity in a room to bring a real splash of color, personality, and theming to a space.

In a recent blog, I shared with you how to design and paint a giant Lego mural, a project I undertook as part of my own home project to transform my unused dining room into a Lego gallery! The next phase in my project was to make curtains. While I kept the mural fairly neutral, using only shades of gray, so that the Lego projects themselves would pop, I don't intend to have anything in front of the window so the curtains could afford to be a bit more
bold. I'm leaning towards a gray with yellow accents color scheme here, so naturally, I put that pop of yellow in my curtains.

For reference, here's an inspiration picture I am using. While I'm not going to mimic anything specific in it, I like the modern, adult look of the color scheme. My worry is that Lego lends itself to a childish look with the primary colors - yellow, blue and red, being predominant brick colors in most Lego-themed rooms (and indeed at Legoland and Lego stores, etc). I don't have kids - by choice - and therefore I want my Lego gallery to have a little bit of class and maturity about it.

Alright, back to the curtains. I actually got the idea of the fabric design while designing my mural wall. As with all my designs, I had started with sketches (in PowerPoint, my design hack tool of choice) to play with the look and feel of various ideas. So the "winning" design for my mural easily translated to a design I could upload into my Spoonflower shop and buy.

Pick a Design, Have it Made

For the less handy/DIY people out there, this could be where the blog stops. Spoonflower has an array of home goods that can be custom made with any of the 1000s of designs on the site. It is a bit more expensive, than, say, curtains you might find at Ikea or Target, but you get to have the EXACT design and dimensions you want. You can simply browse the Spoonflower fabric designs, and when you find a design you like, straight from a fabric page, click the link that says "Also available in Wallpaper & Home Decor", as shown here.


Alternatively, grab the fabric design number from the URL, as shown above, and add it to this URL:
https://www.spoonflower.com/en/products/


In the above example, it would be https://www.spoonflower.com/en/products/645453 and
would look like this:


Make a Design, Have it Made

You can take it one step further without being handy still, and upload your own design, and do the same thing! Now, if you're not experienced in designing fabrics, I would strongly recommend that you proof the fabric first ($5 or less per proof, depending on how many you buy), before investing in the full set of curtains or other products.

One of the best things about buying from the Spoonflower products is that the curtains come with both rod pocket and tab hanging options (one on each end). So you get some flexibility in how your curtains will hang, and can even change it up later if you want a slightly different look.

Sew it Yourself

Whether you're picking a design someone made on Spoonflower, or designing it yourself, the rest of this post will talk about the ease of sewing fabric into curtains yourself. For this project, I used my own design "Yellow Brick Road" and bought 6 yards (56" x 216") of Cypress Cotton Canvas. (Fabric page here: https://www.spoonflower.com/designs/13210876-yellow-brick-road-by-lowa84)

For comparison of cost, two 96" panels would have cost $288 from the Spoonflower products page (using the same material - you could also save some by switching to Linen Cotton Canvas). My purchase of raw fabric set me back $204. If you are using someone else's design, it will cost a little more because that designer gets the commission - in this case, instead of paying myself commission, Spoonflower simply knocks that off the price since I was the designer.

Since I already have a sewing machine and all other supplies, I saved about $84 by making the curtains myself. If you're thinking about buying a sewing machine and all the associated supplies ONLY for this project, the savings might not be worth it. But, I also would vouch for the impressive power of inspiration that comes from a small, successful project. I'm a big believer that people enjoy things more when they make them themselves, and that seeing your handiwork empowers and inspires you to do more. If you're a first time crafter and you might want to do more in the future, I say go for it!! Making matching pillows, hand towels, table runners and all sorts of others things are just as easy (or maybe easier)!!

Alright, back to curtains again (also - don't laugh at my craft room, I haven't painted or redone it yet, so it still has awful pink paint from the previous owner's granddaughter, complete with a cringey "Live Laugh Love motif on the wall"). One last thing - I'm going to share here what I actually did, which I'll refer to as "my hack", as well as what the expert advice says. The expert advice should in theory result in a more finished look, especially on the back of the curtains. For my purposes, I have blinds behind the curtains also, and I was a little nervous with sewing such thick fabric, so I went with a less polished look in the back, which still looks great from the front.

Step 1: Cut the fabric to size

Getting started on a new project, especially if it feels a little daunting, is often the hardest part. Once you've measured your windows and decided how big you want the curtains, measure out how much you need from the fabric.

Another consideration before you start cutting is how you want to attach the curtains to the rods. If you use Clip on Rings, you just need to sew a straight panel. Loops or tabs that extend beyond the curtain panel are another approach, and you'll need to consider how to incorporate those into the top of your curtain (a great tutorial for that is here: https://www.onlinefabricstore.com/makersmill/how-to-make-tab-top-curtains/). A fairly straight-forward approach is to leave the sides of your top stich open and put the rod through the entire thing - that's a rod pocket design. For my hack, I made loops or tabs but hid them behind the top of the curtains so they aren't visible from the front.

You'll want to give yourself at least four inches on the bottom and at least two inches on the top, plus and inch or two on both sides (so make sure to double whatever you choose for the sides). Cut the fabric into the rough size panels.
When you get  fabric from Spoonflower, you'll have some white borders around the design. You'll want to trim this off.

For reference, the windows I'm covering span a total of 62" across, and 70" tall. Hanging just above them and reaching close to the ground, the 96" length was the look I opted for.

Step 2: Sew the sides of the panels

Using an iron and pins, fold each side of each panel down about an inch, and iron that seam to make it nice and crisp. The experts recommend you fold the fabric over once more and do that again, however, my hack got away with just one fold on each side.

Curtains are great sewing projects because they involve a lot of straight stiches. Once you have your sides pinned and ironed down (pin optional, but I preferred it given the bulky material and sheer length of the hem), simply sew as straight as you can along the fabric fold. Truth be told, if you're worried about  getting this absolutely straight, I'd advice not to stress to much. The finished product is so much bigger than these small lines, that it will be hard to notice minor flaws like that from afar - and most of your guests won't be examining the stitch lines along every seam - I hope.

Step 3: Make the loops / tabs and sew the top

Again, this part will vary depending on which style you want. I used some of the white border fabric, and cut 10 evenly sized strips about 5 inches long and 2 inches wide. They don't have to be perfect, in my hack.

Taking the top of the panel and folding it down a couple inches, just as you did on the sides but with a little more length, I also pinned the loops down so that the tops of the loops were just below the fold. After pinning and ironing all of that, I again just sewed a straight line across, making sure that the loops were straight as I got to them.

Step 4: Pin and sew the bottom

Since in my hack I winged it a little bit, decided to get the bottom length just right, I would hang the curtains to see just how much to fold. So I hung the curtains, selected the length and pinned them right there while they were still hanging. Then I brought them back to my craft room and ironed that fold as before, adding additional pins. While I did this for both panels, it may be most important to do this on the second one, to make sure it lines up with the first.

After ironing and sewing, the final sewing begins, once again straight across, like an old pro by now.

Step 5: Hang the final curtains gloriously and admire your work

With the tab arrangement I used, simply sliding them onto the curtain rod made them look a little frumpy, but it was an easy adjustment to get the top of the curtains to stand up right. Additionally, I adjusted and played with the pleats to make them hang right. In the end, none of the hack choices I made seemed to show or make much of a difference. The bright, bold yellow makes a real statement in the gray room, and I'm darn happy about it.


Sunday, July 3, 2022

How To: Lego Mural

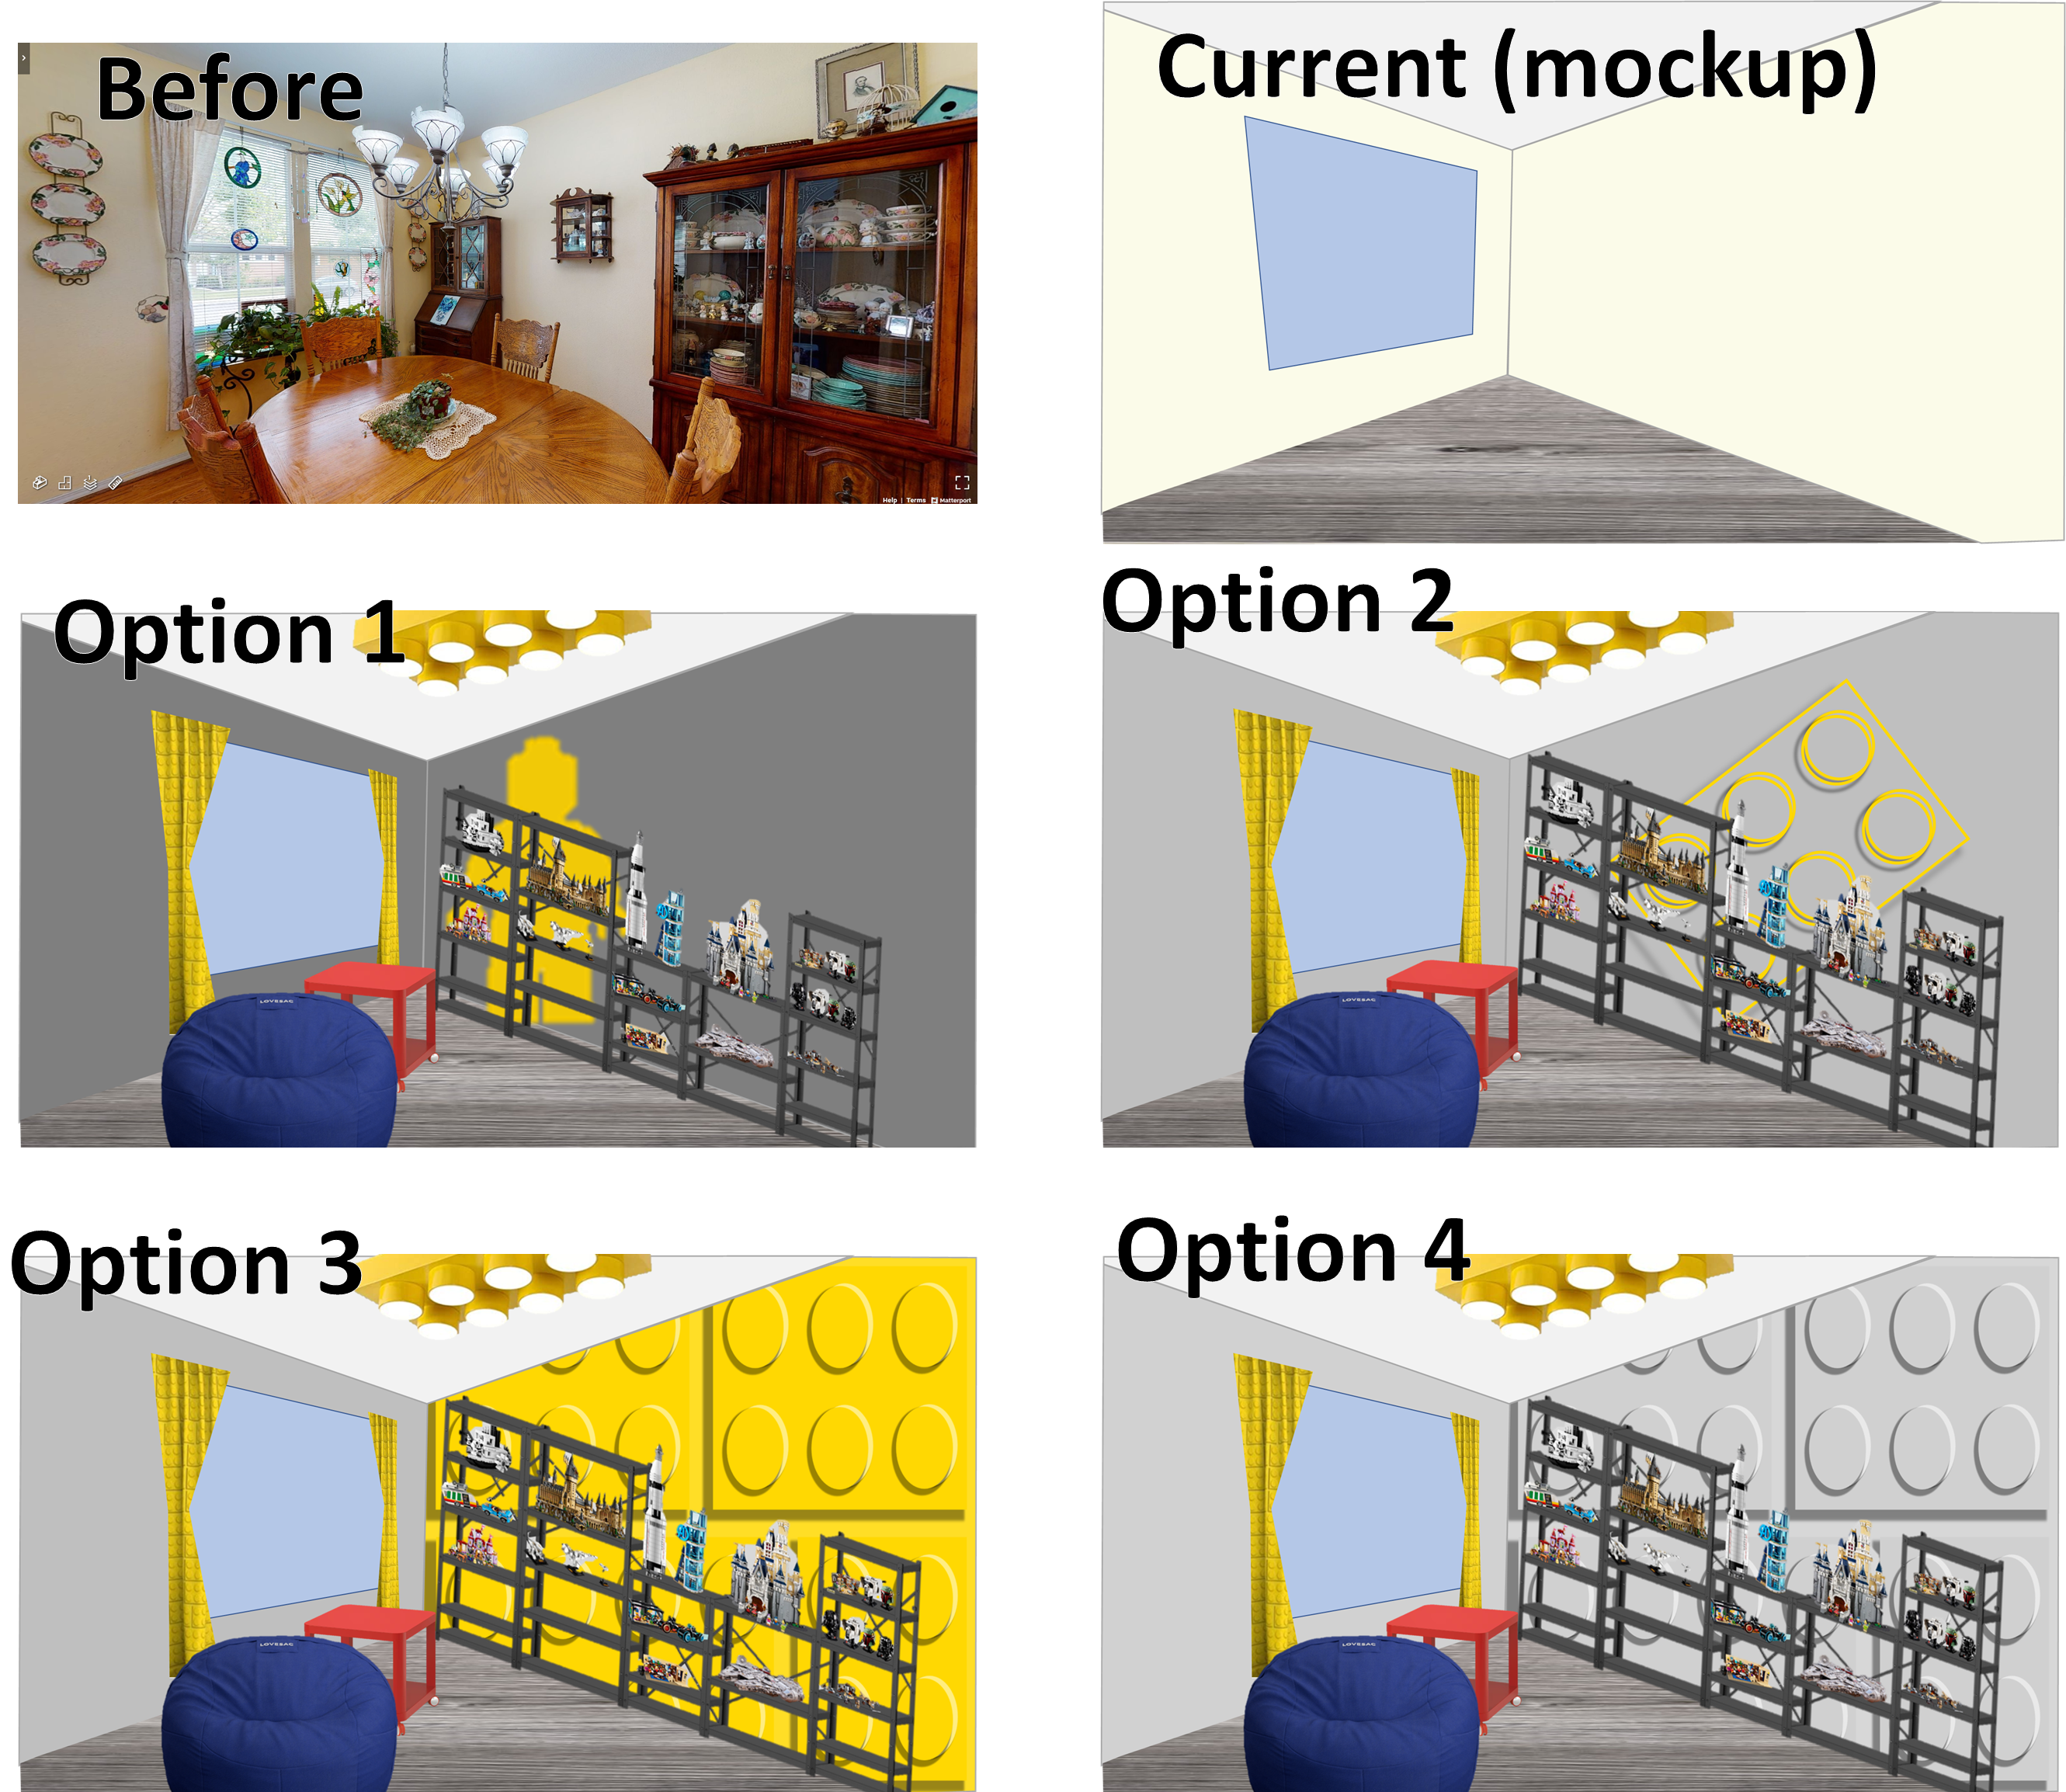
My house is a Lego house. Not literally, but only because we haven't built our dream house yet (which will most definitely incorporate a Lego feature). Anyways, we have a lot of Lego sets and MOCs (My Own Creations). Since we eat dinner on the couch primarily, we don't have a functional need for our dining room. So I'm transforming our sad pastel old-person dining room into a Lego Gallery. Before I get the furniture and textiles, I'm painting the walls and adding a couple murals. I thought I'd take you along and provide some tips for those wanting to do something similar.

Pre-work: Choose your design. I had my friends on social media vote on my mural design, and the consensus was between options 3 & 4. Feel free to take inspiration from any of these designs! 


I plan to put a shelving unit for a Lego gallery in front of the wall, so I thought the yellow would be too distracting. Thus, I selected the gray design.

The key to this mural is that the base color is the same as the brick color and the top of the studs. So in all reality, after the base coat is up, all I'm going to paint are the highlights and the shadows. It's a negative space trick! Neat, huh?


How to Paint this Lego Mural

Step 1: Paint the base color. I actually brought to Home Depot a giant Lego block to do an exact color match (more precisely, I brought the gray Lego wall hanger). For the shadow I needed a darker gray, and I used a swatch that went well with my lighter gray color. I had white paint lying around, so planned to use that for the highlight color (later, I decided  that the white was too stark, so I mixed some of it with the wall color).

Step 2: Cut a pizza pan-shaped circle in an old Lego box. The mosaic kits are great square boxes for this purpose. I'll refer to mine as Marilynizza (you'll see why later).

Step 3: Measure Marilynizza, representing the size of the stud, and then determine relative dimensions, including room for shadows and highlights. These are rough dimensions I measured by using PowerPoint (because I'm a weird nerd and use PowerPoint for all visuals).


Step 4: Tape a grid on the wall. Notice it's not a perfect grid throughout. I've made room in between my "bricks", as indicated by the green tape. I started with the bottom to make sure I had my technique down, and also because I got tired of taping and wanted to dive into the painting!


Step 5: Line up the bottom and left edges of the taped square with Marilynizza.


Step 6: Trace the outside left and bottom. With paint. Specifically, a darker shade than the base coat, to create the illusion of a shadow. A smaller, artistic brush, is recommended for this.


Step 7: Slide Marilynizza over and fill in the gap with the shadow-colored paint. Just for fun, the color of the wet paint in the darker grey looks almost exactly like the dry color of the lighter grey, making an additional challenge in ensuring coverage. The good news, shadows can be a little fuzzy, so it's okay if it's a little imperfect.


Step 8: Remove Marilynizza and watch the paint dry. Just kidding! You have a million more studs to do, keep going! 

Pro Tip: I noticed the paint started getting on the back of Marilynizza and then transferring to the next part of the wall where I didn't want it, so I started wiping the paint off the back of her after each "stud" was complete.

Step 9: After the paint has sufficiently dried, use the other side of Marilynizza to paint the highlights of the studs. Line her up with the top and right edges of the box for the first trace in a lighter color or white, then slide her over and fill it in, just like before! 

Pro Tip: Once the tape is up, painting the crescent shapes for the stud shadows and highlights went pretty fast. For the upper ones, I needed an extra pair of hands so my love supported by holding the paint while I was up on the step ladder with my Marilynizza and paintbrush. For studs at height, definitely a good idea to have a partner to help you out! 


Step 10: Remove the tape for the stud sections, and put any more tape down as needed to line out the shadows of the Lego bricks. 

Step 11: Paint the shadows in the darker color. (This also goes quite quick. I was too excited so I forgot to take a picture of the tape before painting.)


Step 12: After the paint dries, remove your tape and do any touch-ups as you see necessary.


Step 12.5: Enjoy your new mural! Or, immediately cover it up with all your more intricate Lego builds! 

I am thrilled with how the mural turned out! Even with some imperfect measurements I noticed half way through the project, I think the objective of the vision was achieved. My technique was certainly inconsistent from stud to stud, repeated over 28 times on both sides, but none of those details really show when you look at the broader picture. 

Stay tuned (and subscribe) to see how the Lego Gallery room comes together. Lights, curtains, furniture, and of course, the Lego sets and MOCs, still to come! 

Next up: Lego curtains!