You know what? Maybe you're right. Maybe this is the end. Because even when I was trying to help you see how you're hurting me, you somehow managed to BLAME ME for it. So, maybe it's hopeless. Am I thrilled with everything I've ever done? No, of course not. But I've also put up with a lot of shit. The eye-rolling when I remind you to do something that will help you with YOUR goal. Letting to live with me for zero rent for months or years, in exchange for a limited amount of housework and cooking. When I was single before we met, I had given up on love. I had thought that I had achieved so much success and all I wanted was someone to share it with. I think the issue is that my sharing had no bounds, and you took full advantage of that. Did I let you? Sure I did. I excuse it as exhaustion from work, I don't have any energy to fight you. But I'm not sure I'm right about that. You've been passive aggressive in so many ways, I wonder if this was another mental trick you're playing on me. You may not even realize it. Somehow, I have let you walk all over me while I'm too exhausted or confused or befuddled to fight it.
Andrew's relationship with Tiffany is very instructive. It's not the same, but it has similarities. He has been dealing with a ton of crap at work, and having broken up with his last girlfriend, Tiffany managed to snake her way into the position. Andrew allowed it, of course, but even as Tiffany dreamed she could demand Andrew stay here in California, and Andrew insisted he would not, she still somehow became a "love" for him.
Way back in the day, I had pretty shallow criteria for a boyfriend. I wanted him to be tall, like swing dancing, musicals and football, and you fit the bill. Before that, I thought I wanted someone more ambitious, to challenge me, be my other half in a power couple. I know and am grateful that I've been able to move around the country for my job due in large part to the fact that you didn't have a really important job - most of the time you were generally pretty stoked about quitting, even if you weren't sure what you wanted to do. And you helped with the moves, which was super helpful for me.
I guess I'm at a loss now, because none of that other stuff seems super important, whether you like the same things that I do or whatever. I mean, we rarely swing dance anymore, and even that feels like a "chore" I am making you do. We haven't gone to a football game in forever, partially due to COVID but even before then we weren't doing a lot of it, and I actually found weekends plopped in front of the couch watching football to be far too much, too boring, too unproductive, too lazy and the season seemed to last too long. We have gone to see musicals, and I do value that, and your knowledge of the performers.
What seems to be important now is you being a partner and I don't think you've been like that in a long time. I really honestly struggle to remember our first year or two, because it felt like a permanent state of honeymoon fever, we were inseparable and I don't think we fought much. We managed to go on this massively long road trip together without killing each other.
I still want someone to travel with and have fun with on the weekends. Maybe I like being in a relationship because it guarantees a friend and travel buddy, and maybe that's not the right reason to be in a relationship. But honestly, even that has been bothering me - when we're travelling it seems so hard to get you out of bed some mornings - unless it's a theme park and then you are up at the crack of dawn to rope drop. When we were with my family most recently in North Carolina, and the trip pivoted because of Matthew's injury, you seemed to want to make it all about you somehow. It was very selfish. We overrode you, to be sure, but I just couldn't even believe you would suggest things that put your interests ahead of what the group wanted or needed to do.
So I'm sitting trying to think if I'm going to regret breaking up with you. Will my life be that much worse off that I'll want you to come back? I'll probably read more, with the TV not always being on. I would hopefully exercise more, not needing to tiptoe around your sleep schedule and again not being deterred by the TV being on. But I would be lonely. I won't have someone guaranteed to go out to dinner with. I'll have to make plans with friends and colleagues. I won't have someone to give me back massages and foot massages - I'll have to go back to Massage Envy or another place for that. I won't have dinner ready-made for me when I walk in the door, I'll have to plan and cook my own meals - it will probably be a lot more microwaveable stuff. I won't have someone doing the dishes, so I'll have to do that on my own, which sucks because I know that will hurt my back. I won't have someone taking care of spiders and bugs, so I'll have to be brave and toughen up a little. I'll need to hire a gardener and a pool guy, because I know I won't keep that stuff maintained on my own. I'll have an extra empty room, maybe I'll get a roommate? But that would be weird - most people I work with are lower levels and moving in with a "boss" might be strange. I'll probably listen to Christmas music sooner and much more often.
But it will be lonely. I won't have someone to vent to when I get home. I won't have someone to plan weekends with, or projects, or tell about my next crazy idea.
You help me decompress by choosing entertainment things so I don't have to navigate or think through that. That helps. But I also have a big mental burden in carrying all the mental lists of chores, plans, schedules, helping you to achieve your professed goals.
It's kind of ironic timing to break up now. I had visited San Fran a couple times before meeting you, and that was one of those things we always talked about doing, so that you would have a better experience. We just finally went. To me, some of it was repeating the experience with the new person in my life, although we did do some things that were new to me.
Sunday, July 24, 2022
May Be The End
How To: Custom Curtains
 One of the aspects of the "Long Tail" which the Internet and companies like ebay, Etsy and now Spoonflower ushered in is that there is almost no limit to the ability to find (or make) exactly what you want. In other words, if you can dream it, you can find it (or make it with relative ease). Taking advantage of this, I'm going to talk to you today about designing and buying or making custom curtains. Curtains are, I think, an underrated opportunity in a room to bring a real splash of color, personality, and theming to a space.
 In a recent blog, I shared with you how to design and paint a giant Lego mural, a project I undertook as part of my own home project to transform my unused dining room into a Lego gallery! The next phase in my project was to make curtains. While I kept the mural fairly neutral, using only shades of gray, so that the Lego projects themselves would pop, I don't intend to have anything in front of the window so the curtains could afford to be a bit more
 bold. I'm leaning towards a gray with yellow accents color scheme here, so naturally, I put that pop of yellow in my curtains.
 Alright, back to the curtains. I actually got the idea of the fabric design while designing my mural wall. As with all my designs, I had started with sketches (in PowerPoint, my design hack tool of choice) to play with the look and feel of various ideas. So the "winning" design for my mural easily translated to a design I could upload into my Spoonflower shop and buy.
Pick a Design, Have it Made
For the less handy/DIY people out there, this could be where the blog stops. Spoonflower has an array of home goods that can be custom made with any of the 1000s of designs on the site. It is a bit more expensive, than, say, curtains you might find at Ikea or Target, but you get to have the EXACT design and dimensions you want. You can simply browse the Spoonflower fabric designs, and when you find a design you like, straight from a fabric page, click the link that says "Also available in Wallpaper & Home Decor", as shown here.
Alternatively, grab the fabric design number from the URL, as shown above, and add it to this URL:
https://www.spoonflower.com/en/products/
In the above example, it would be https://www.spoonflower.com/en/products/645453 and
would look like this:

Make a Design, Have it Made
You can take it one step further without being handy still, and upload your own design, and do the same thing! Now, if you're not experienced in designing fabrics, I would strongly recommend that you proof the fabric first ($5 or less per proof, depending on how many you buy), before investing in the full set of curtains or other products.
One of the best things about buying from the Spoonflower products is that the curtains come with both rod pocket and tab hanging options (one on each end). So you get some flexibility in how your curtains will hang, and can even change it up later if you want a slightly different look.
Sew it Yourself
Whether you're picking a design someone made on Spoonflower, or designing it yourself, the rest of this post will talk about the ease of sewing fabric into curtains yourself. For this project, I used my own design "Yellow Brick Road" and bought 6 yards (56" x 216") of Cypress Cotton Canvas. (Fabric page here: https://www.spoonflower.com/designs/13210876-yellow-brick-road-by-lowa84)
For comparison of cost, two 96" panels would have cost $288 from the Spoonflower products page (using the same material - you could also save some by switching to Linen Cotton Canvas). My purchase of raw fabric set me back $204. If you are using someone else's design, it will cost a little more because that designer gets the commission - in this case, instead of paying myself commission, Spoonflower simply knocks that off the price since I was the designer.
Since I already have a sewing machine and all other supplies, I saved about $84 by making the curtains myself. If you're thinking about buying a sewing machine and all the associated supplies ONLY for this project, the savings might not be worth it. But, I also would vouch for the impressive power of inspiration that comes from a small, successful project. I'm a big believer that people enjoy things more when they make them themselves, and that seeing your handiwork empowers and inspires you to do more. If you're a first time crafter and you might want to do more in the future, I say go for it!! Making matching pillows, hand towels, table runners and all sorts of others things are just as easy (or maybe easier)!!
Alright, back to curtains again (also - don't laugh at my craft room, I haven't painted or redone it yet, so it still has awful pink paint from the previous owner's granddaughter, complete with a cringey "Live Laugh Love motif on the wall"). One last thing - I'm going to share here what I actually did, which I'll refer to as "my hack", as well as what the expert advice says. The expert advice should in theory result in a more finished look, especially on the back of the curtains. For my purposes, I have blinds behind the curtains also, and I was a little nervous with sewing such thick fabric, so I went with a less polished look in the back, which still looks great from the front.
Step 1: Cut the fabric to size
 Getting started on a new project, especially if it feels a little daunting, is often the hardest part. Once you've measured your windows and decided how big you want the curtains, measure out how much you need from the fabric.
Another consideration before you start cutting is how you want to attach the curtains to the rods. If you use Clip on Rings, you just need to sew a straight panel. Loops or tabs that extend beyond the curtain panel are another approach, and you'll need to consider how to incorporate those into the top of your curtain (a great tutorial for that is here: https://www.onlinefabricstore.com/makersmill/how-to-make-tab-top-curtains/). A fairly straight-forward approach is to leave the sides of your top stich open and put the rod through the entire thing - that's a rod pocket design. For my hack, I made loops or tabs but hid them behind the top of the curtains so they aren't visible from the front.
You'll want to give yourself at least four inches on the bottom and at least two inches on the top, plus and inch or two on both sides (so make sure to double whatever you choose for the sides). Cut the fabric into the rough size panels.
When you get fabric from Spoonflower, you'll have some white borders around the design. You'll want to trim this off.
For reference, the windows I'm covering span a total of 62" across, and 70" tall. Hanging just above them and reaching close to the ground, the 96" length was the look I opted for.
Step 2: Sew the sides of the panels
 Using an iron and pins, fold each side of each panel down about an inch, and iron that seam to make it nice and crisp. The experts recommend you fold the fabric over once more and do that again, however, my hack got away with just one fold on each side.
Curtains are great sewing projects because they involve a lot of straight stiches. Once you have your sides pinned and ironed down (pin optional, but I preferred it given the bulky material and sheer length of the hem), simply sew as straight as you can along the fabric fold. Truth be told, if you're worried about getting this absolutely straight, I'd advice not to stress to much. The finished product is so much bigger than these small lines, that it will be hard to notice minor flaws like that from afar - and most of your guests won't be examining the stitch lines along every seam - I hope.
Step 3: Make the loops / tabs and sew the top
 Again, this part will vary depending on which style you want. I used some of the white border fabric, and cut 10 evenly sized strips about 5 inches long and 2 inches wide. They don't have to be perfect, in my hack.
Taking the top of the panel and folding it down a couple inches, just as you did on the sides but with a little more length, I also pinned the loops down so that the tops of the loops were just below the fold. After pinning and ironing all of that, I again just sewed a straight line across, making sure that the loops were straight as I got to them.
Step 4: Pin and sew the bottom
Since in my hack I winged it a little bit, decided to get the bottom length just right, I would hang the curtains to see just how much to fold. So I hung the curtains, selected the length and pinned them right there while they were still hanging. Then I brought them back to my craft room and ironed that fold as before, adding additional pins. While I did this for both panels, it may be most important to do this on the second one, to make sure it lines up with the first.
After ironing and sewing, the final sewing begins, once again straight across, like an old pro by now.
Step 5: Hang the final curtains gloriously and admire your work
 With the tab arrangement I used, simply sliding them onto the curtain rod made them look a little frumpy, but it was an easy adjustment to get the top of the curtains to stand up right. Additionally, I adjusted and played with the pleats to make them hang right. In the end, none of the hack choices I made seemed to show or make much of a difference. The bright, bold yellow makes a real statement in the gray room, and I'm darn happy about it.


Sunday, July 3, 2022
How To: Lego Mural
Pre-work: Choose your design. I had my friends on social media vote on my mural design, and the consensus was between options 3 & 4. Feel free to take inspiration from any of these designs!
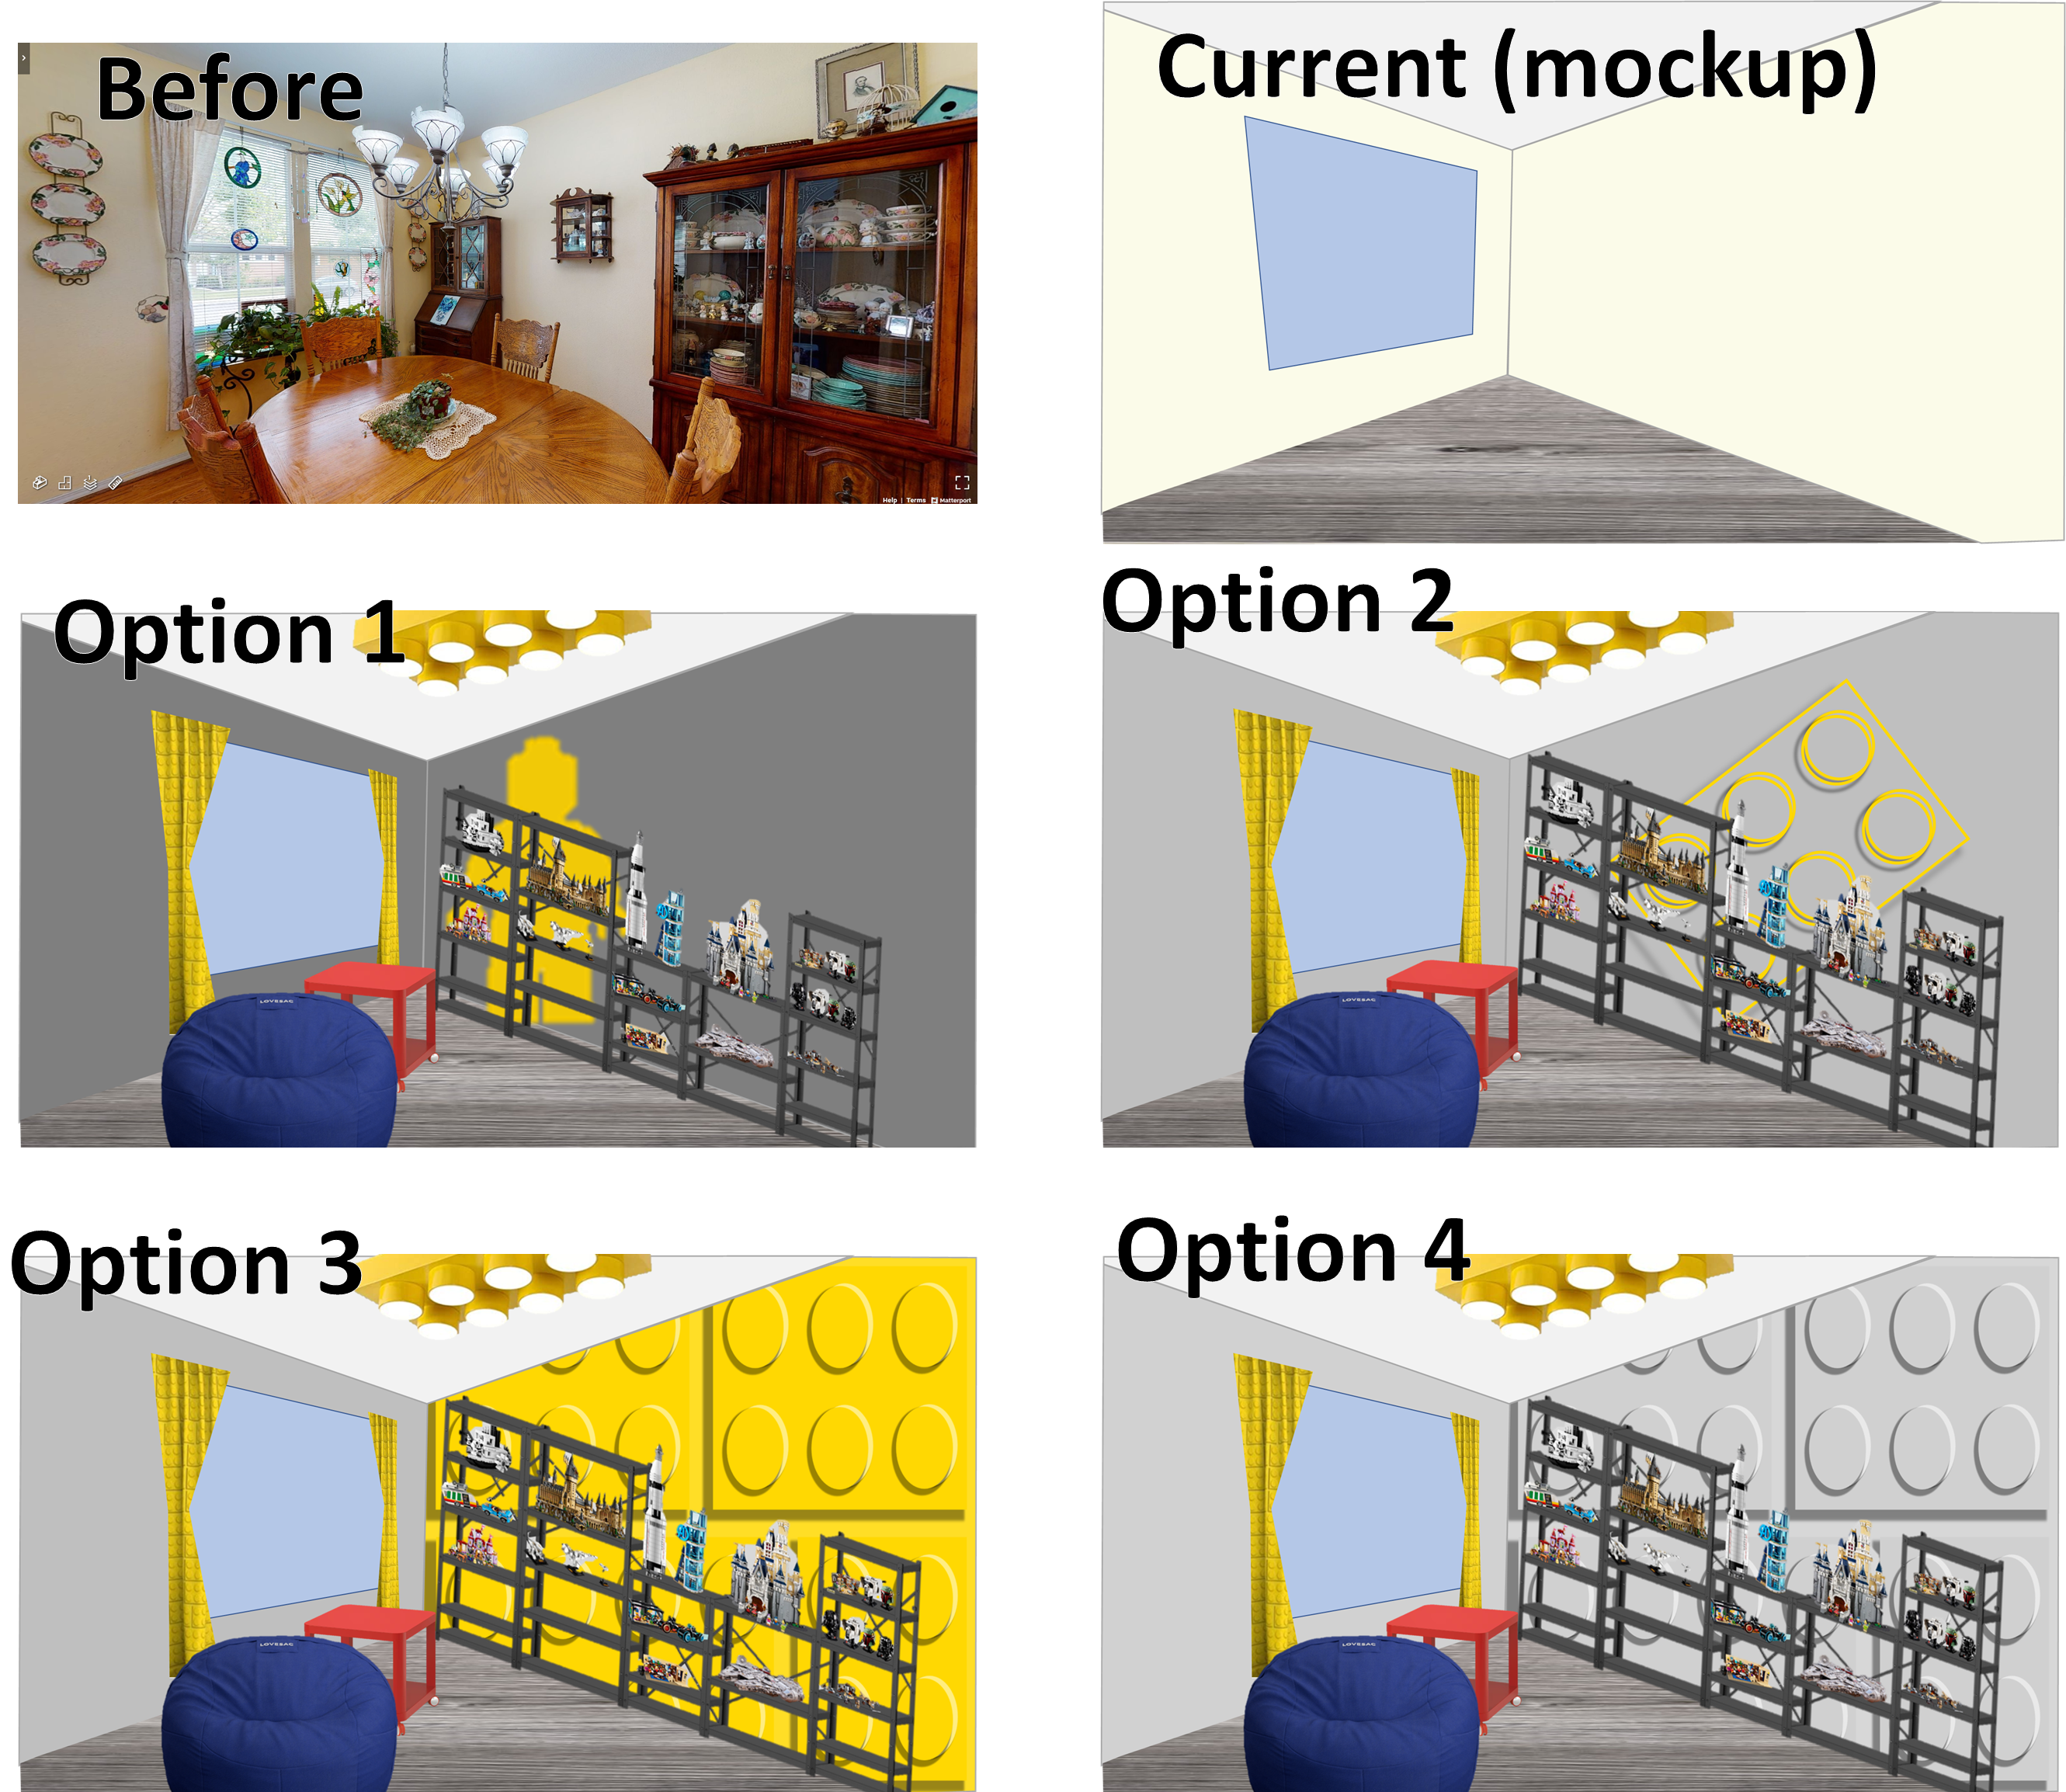

I plan to put a shelving unit for a Lego gallery in front of the wall, so I thought the yellow would be too distracting. Thus, I selected the gray design.

The key to this mural is that the base color is the same as the brick color and the top of the studs. So in all reality, after the base coat is up, all I'm going to paint are the highlights and the shadows. It's a negative space trick! Neat, huh?

How to Paint this Lego Mural
Step 1: Paint the base color. I actually brought to Home Depot a giant Lego block to do an exact color match (more precisely, I brought the gray Lego wall hanger). For the shadow I needed a darker gray, and I used a swatch that went well with my lighter gray color. I had white paint lying around, so planned to use that for the highlight color (later, I decided that the white was too stark, so I mixed some of it with the wall color).
Step 2: Cut a pizza pan-shaped circle in an old Lego box. The mosaic kits are great square boxes for this purpose. I'll refer to mine as Marilynizza (you'll see why later).
Step 3: Measure Marilynizza, representing the size of the stud, and then determine relative dimensions, including room for shadows and highlights. These are rough dimensions I measured by using PowerPoint (because I'm a weird nerd and use PowerPoint for all visuals).

Step 4: Tape a grid on the wall. Notice it's not a perfect grid throughout. I've made room in between my "bricks", as indicated by the green tape. I started with the bottom to make sure I had my technique down, and also because I got tired of taping and wanted to dive into the painting!

Step 5: Line up the bottom and left edges of the taped square with Marilynizza.

Step 6: Trace the outside left and bottom. With paint. Specifically, a darker shade than the base coat, to create the illusion of a shadow. A smaller, artistic brush, is recommended for this.
Step 7: Slide Marilynizza over and fill in the gap with the shadow-colored paint. Just for fun, the color of the wet paint in the darker grey looks almost exactly like the dry color of the lighter grey, making an additional challenge in ensuring coverage. The good news, shadows can be a little fuzzy, so it's okay if it's a little imperfect.

Step 8: Remove Marilynizza and watch the paint dry. Just kidding! You have a million more studs to do, keep going!
Pro Tip: I noticed the paint started getting on the back of Marilynizza and then transferring to the next part of the wall where I didn't want it, so I started wiping the paint off the back of her after each "stud" was complete.
Step 9: After the paint has sufficiently dried, use the other side of Marilynizza to paint the highlights of the studs. Line her up with the top and right edges of the box for the first trace in a lighter color or white, then slide her over and fill it in, just like before!
Pro Tip: Once the tape is up, painting the crescent shapes for the stud shadows and highlights went pretty fast. For the upper ones, I needed an extra pair of hands so my love supported by holding the paint while I was up on the step ladder with my Marilynizza and paintbrush. For studs at height, definitely a good idea to have a partner to help you out!

Step 10: Remove the tape for the stud sections, and put any more tape down as needed to line out the shadows of the Lego bricks.
Step 11: Paint the shadows in the darker color. (This also goes quite quick. I was too excited so I forgot to take a picture of the tape before painting.)

Step 12: After the paint dries, remove your tape and do any touch-ups as you see necessary.

Step 12.5: Enjoy your new mural! Or, immediately cover it up with all your more intricate Lego builds!
I am thrilled with how the mural turned out! Even with some imperfect measurements I noticed half way through the project, I think the objective of the vision was achieved. My technique was certainly inconsistent from stud to stud, repeated over 28 times on both sides, but none of those details really show when you look at the broader picture.
Stay tuned (and subscribe) to see how the Lego Gallery room comes together. Lights, curtains, furniture, and of course, the Lego sets and MOCs, still to come!
Next up: Lego curtains!