 One of the aspects of the "Long Tail" which the Internet and companies like ebay, Etsy and now Spoonflower ushered in is that there is almost no limit to the ability to find (or make) exactly what you want. In other words, if you can dream it, you can find it (or make it with relative ease). Taking advantage of this, I'm going to talk to you today about designing and buying or making custom curtains. Curtains are, I think, an underrated opportunity in a room to bring a real splash of color, personality, and theming to a space.
In a recent blog, I shared with you how to design and paint a giant Lego mural, a project I undertook as part of my own home project to transform my unused dining room into a Lego gallery! The next phase in my project was to make curtains. While I kept the mural fairly neutral, using only shades of gray, so that the Lego projects themselves would pop, I don't intend to have anything in front of the window so the curtains could afford to be a bit more  bold. I'm leaning towards a gray with yellow accents color scheme here, so naturally, I put that pop of yellow in my curtains.
Alright, back to the curtains. I actually got the idea of the fabric design while designing my mural wall. As with all my designs, I had started with sketches (in PowerPoint, my design hack tool of choice) to play with the look and feel of various ideas. So the "winning" design for my mural easily translated to a design I could upload into my Spoonflower shop and buy.
Pick a Design, Have it Made
For the less handy/DIY people out there, this could be where the blog stops. Spoonflower has an array of home goods that can be custom made with any of the 1000s of designs on the site. It is a bit more expensive, than, say, curtains you might find at Ikea or Target, but you get to have the EXACT design and dimensions you want. You can simply browse the Spoonflower fabric designs, and when you find a design you like, straight from a fabric page, click the link that says "Also available in Wallpaper & Home Decor", as shown here.

Alternatively, grab the fabric design number from the URL, as shown above, and add it to this URL:
https://www.spoonflower.com/en/products/

In the above example, it would be https://www.spoonflower.com/en/products/645453 and
would look like this:

Make a Design, Have it Made
You can take it one step further without being handy still, and upload your own design, and do the same thing! Now, if you're not experienced in designing fabrics, I would strongly recommend that you proof the fabric first ($5 or less per proof, depending on how many you buy), before investing in the full set of curtains or other products.
One of the best things about buying from the Spoonflower products is that the curtains come with both rod pocket and tab hanging options (one on each end). So you get some flexibility in how your curtains will hang, and can even change it up later if you want a slightly different look.
Sew it Yourself
Whether you're picking a design someone made on Spoonflower, or designing it yourself, the rest of this post will talk about the ease of sewing fabric into curtains yourself. For this project, I used my own design "Yellow Brick Road" and bought 6 yards (56" x 216") of Cypress Cotton Canvas. (Fabric page here: https://www.spoonflower.com/designs/13210876-yellow-brick-road-by-lowa84)
For comparison of cost, two 96" panels would have cost $288 from the Spoonflower products page (using the same material - you could also save some by switching to Linen Cotton Canvas). My purchase of raw fabric set me back $204. If you are using someone else's design, it will cost a little more because that designer gets the commission - in this case, instead of paying myself commission, Spoonflower simply knocks that off the price since I was the designer.
Since I already have a sewing machine and all other supplies, I saved about $84 by making the curtains myself. If you're thinking about buying a sewing machine and all the associated supplies ONLY for this project, the savings might not be worth it. But, I also would vouch for the impressive power of inspiration that comes from a small, successful project. I'm a big believer that people enjoy things more when they make them themselves, and that seeing your handiwork empowers and inspires you to do more. If you're a first time crafter and you might want to do more in the future, I say go for it!! Making matching pillows, hand towels, table runners and all sorts of others things are just as easy (or maybe easier)!!
Alright, back to curtains again (also - don't laugh at my craft room, I haven't painted or redone it yet, so it still has awful pink paint from the previous owner's granddaughter, complete with a cringey "Live Laugh Love motif on the wall"). One last thing - I'm going to share here what I actually did, which I'll refer to as "my hack", as well as what the expert advice says. The expert advice should in theory result in a more finished look, especially on the back of the curtains. For my purposes, I have blinds behind the curtains also, and I was a little nervous with sewing such thick fabric, so I went with a less polished look in the back, which still looks great from the front.
Step 1: Cut the fabric to size
 Getting started on a new project, especially if it feels a little daunting, is often the hardest part. Once you've measured your windows and decided how big you want the curtains, measure out how much you need from the fabric.
Another consideration before you start cutting is how you want to attach the curtains to the rods. If you use Clip on Rings, you just need to sew a straight panel. Loops or tabs that extend beyond the curtain panel are another approach, and you'll need to consider how to incorporate those into the top of your curtain (a great tutorial for that is here: https://www.onlinefabricstore.com/makersmill/how-to-make-tab-top-curtains/). A fairly straight-forward approach is to leave the sides of your top stich open and put the rod through the entire thing - that's a rod pocket design. For my hack, I made loops or tabs but hid them behind the top of the curtains so they aren't visible from the front.
You'll want to give yourself at least four inches on the bottom and at least two inches on the top, plus and inch or two on both sides (so make sure to double whatever you choose for the sides). Cut the fabric into the rough size panels.
When you get fabric from Spoonflower, you'll have some white borders around the design. You'll want to trim this off.
For reference, the windows I'm covering span a total of 62" across, and 70" tall. Hanging just above them and reaching close to the ground, the 96" length was the look I opted for.
Step 2: Sew the sides of the panels
 Using an iron and pins, fold each side of each panel down about an inch, and iron that seam to make it nice and crisp. The experts recommend you fold the fabric over once more and do that again, however, my hack got away with just one fold on each side.
Curtains are great sewing projects because they involve a lot of straight stiches. Once you have your sides pinned and ironed down (pin optional, but I preferred it given the bulky material and sheer length of the hem), simply sew as straight as you can along the fabric fold. Truth be told, if you're worried about getting this absolutely straight, I'd advice not to stress to much. The finished product is so much bigger than these small lines, that it will be hard to notice minor flaws like that from afar - and most of your guests won't be examining the stitch lines along every seam - I hope.
Step 3: Make the loops / tabs and sew the top
 Again, this part will vary depending on which style you want. I used some of the white border fabric, and cut 10 evenly sized strips about 5 inches long and 2 inches wide. They don't have to be perfect, in my hack.
Taking the top of the panel and folding it down a couple inches, just as you did on the sides but with a little more length, I also pinned the loops down so that the tops of the loops were just below the fold. After pinning and ironing all of that, I again just sewed a straight line across, making sure that the loops were straight as I got to them.
Step 4: Pin and sew the bottom
Since in my hack I winged it a little bit, decided to get the bottom length just right, I would hang the curtains to see just how much to fold. So I hung the curtains, selected the length and pinned them right there while they were still hanging. Then I brought them back to my craft room and ironed that fold as before, adding additional pins. While I did this for both panels, it may be most important to do this on the second one, to make sure it lines up with the first.
After ironing and sewing, the final sewing begins, once again straight across, like an old pro by now.
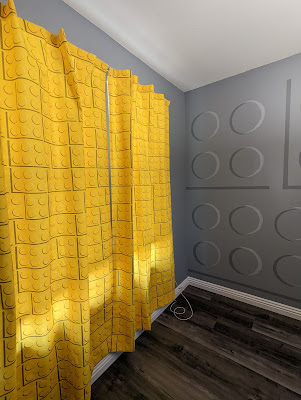
Step 5: Hang the final curtains gloriously and admire your work
 With the tab arrangement I used, simply sliding them onto the curtain rod made them look a little frumpy, but it was an easy adjustment to get the top of the curtains to stand up right. Additionally, I adjusted and played with the pleats to make them hang right. In the end, none of the hack choices I made seemed to show or make much of a difference. The bright, bold yellow makes a real statement in the gray room, and I'm darn happy about it.


 What I look for in my STEM toys is something that kids can learn from. Years ago I found these small solar car kits - those were my favorite! First, you have to build the car from the parts. Once assembled, you had to learn how to use it in the sun. But in the right light, those things took off! And there was no stopping mechanism, so you just had to hope it would find shade to stop. Finding those again, and on the cheap, however, has proved difficult. So I've had to search for alternatives.


