Showing posts with label crafts. Show all posts

Sunday, November 20, 2022

DIY Christmas: Stockings Sew Easy!


I am a little obsessed with my homemade stockings inspired by the movie, Elf. This was my first time making my own stockings and I was surprised how easy they were! 

Briefly, the steps I took:
  1. Fold the fabric in half and cut the shapes using a general pattern or reference, such that there are two pieces which are mirror images of each other. 
  2. Sew across the white fur on both "outside" faces of the fabrics. 
  3. Place the outsides facing each other and pin in place. 
  4. Sew around the sides and flip inside out when done - just like making a pillow! That way, my imperfect sewing is concealed inside, and all you see on the outside are nice seams. 
  5. Hot glue decorations - ribbons, belt, bows, etc. Highly recommend this instead of trying to sew decorations on. It seemed to work really well!

Since I had so much fun making these (and honestly, am really proud at how they turned out), I started brainstorming other designs I could make. Take a look at some of my other ideas!  


If you prefer the original Jovie color scheme: 

More "Elf" ideas (if you have more humans raised by humans):

...and some more because I just couldn't stop...


Okay, enough of "Elf", what else we got? How about stockings for Lego fans?  Get the fabrics here.


I've always adored the patterns from Moana! They could be turned into unique stockings for fans! Check them out in my Dress Up Time collection here.


Speaking of Disney, I plan on making a pullstring backpack with my Guardians of the Galaxy: Mission Breakout -inspired fabric, but it could also make a funky stocking!Or use some Tivan-style writing from the Obscure Writing collection.


While there are plenty leopard print designs out there, have you ever seen a giraffe print stocking? Me neither! That's one reason I started my "You Animal" collection - to bring more representation and variation to the animal print options!


The Pantone Color of the Year for 2023 hasn't been announced yet, but it is anticipated to be "Digital Lavender". You can be very fashion forward with these Digital Lavender patterns hanging from your fireplace this year!


Sunday, July 24, 2022

How To: Custom Curtains

One of the aspects of the "Long Tail" which the Internet and companies like ebay, Etsy and now Spoonflower ushered in is that there is almost no limit to the ability to find (or make) exactly what you want. In other words, if you can dream it, you can find it (or make it with relative ease). Taking advantage of this, I'm going to talk to you today about designing and buying or making custom curtains. Curtains are, I think, an underrated opportunity in a room to bring a real splash of color, personality, and theming to a space.

In a recent blog, I shared with you how to design and paint a giant Lego mural, a project I undertook as part of my own home project to transform my unused dining room into a Lego gallery! The next phase in my project was to make curtains. While I kept the mural fairly neutral, using only shades of gray, so that the Lego projects themselves would pop, I don't intend to have anything in front of the window so the curtains could afford to be a bit more
bold. I'm leaning towards a gray with yellow accents color scheme here, so naturally, I put that pop of yellow in my curtains.

For reference, here's an inspiration picture I am using. While I'm not going to mimic anything specific in it, I like the modern, adult look of the color scheme. My worry is that Lego lends itself to a childish look with the primary colors - yellow, blue and red, being predominant brick colors in most Lego-themed rooms (and indeed at Legoland and Lego stores, etc). I don't have kids - by choice - and therefore I want my Lego gallery to have a little bit of class and maturity about it.

Alright, back to the curtains. I actually got the idea of the fabric design while designing my mural wall. As with all my designs, I had started with sketches (in PowerPoint, my design hack tool of choice) to play with the look and feel of various ideas. So the "winning" design for my mural easily translated to a design I could upload into my Spoonflower shop and buy.

Pick a Design, Have it Made

For the less handy/DIY people out there, this could be where the blog stops. Spoonflower has an array of home goods that can be custom made with any of the 1000s of designs on the site. It is a bit more expensive, than, say, curtains you might find at Ikea or Target, but you get to have the EXACT design and dimensions you want. You can simply browse the Spoonflower fabric designs, and when you find a design you like, straight from a fabric page, click the link that says "Also available in Wallpaper & Home Decor", as shown here.


Alternatively, grab the fabric design number from the URL, as shown above, and add it to this URL:
https://www.spoonflower.com/en/products/


In the above example, it would be https://www.spoonflower.com/en/products/645453 and
would look like this:


Make a Design, Have it Made

You can take it one step further without being handy still, and upload your own design, and do the same thing! Now, if you're not experienced in designing fabrics, I would strongly recommend that you proof the fabric first ($5 or less per proof, depending on how many you buy), before investing in the full set of curtains or other products.

One of the best things about buying from the Spoonflower products is that the curtains come with both rod pocket and tab hanging options (one on each end). So you get some flexibility in how your curtains will hang, and can even change it up later if you want a slightly different look.

Sew it Yourself

Whether you're picking a design someone made on Spoonflower, or designing it yourself, the rest of this post will talk about the ease of sewing fabric into curtains yourself. For this project, I used my own design "Yellow Brick Road" and bought 6 yards (56" x 216") of Cypress Cotton Canvas. (Fabric page here: https://www.spoonflower.com/designs/13210876-yellow-brick-road-by-lowa84)

For comparison of cost, two 96" panels would have cost $288 from the Spoonflower products page (using the same material - you could also save some by switching to Linen Cotton Canvas). My purchase of raw fabric set me back $204. If you are using someone else's design, it will cost a little more because that designer gets the commission - in this case, instead of paying myself commission, Spoonflower simply knocks that off the price since I was the designer.

Since I already have a sewing machine and all other supplies, I saved about $84 by making the curtains myself. If you're thinking about buying a sewing machine and all the associated supplies ONLY for this project, the savings might not be worth it. But, I also would vouch for the impressive power of inspiration that comes from a small, successful project. I'm a big believer that people enjoy things more when they make them themselves, and that seeing your handiwork empowers and inspires you to do more. If you're a first time crafter and you might want to do more in the future, I say go for it!! Making matching pillows, hand towels, table runners and all sorts of others things are just as easy (or maybe easier)!!

Alright, back to curtains again (also - don't laugh at my craft room, I haven't painted or redone it yet, so it still has awful pink paint from the previous owner's granddaughter, complete with a cringey "Live Laugh Love motif on the wall"). One last thing - I'm going to share here what I actually did, which I'll refer to as "my hack", as well as what the expert advice says. The expert advice should in theory result in a more finished look, especially on the back of the curtains. For my purposes, I have blinds behind the curtains also, and I was a little nervous with sewing such thick fabric, so I went with a less polished look in the back, which still looks great from the front.

Step 1: Cut the fabric to size

Getting started on a new project, especially if it feels a little daunting, is often the hardest part. Once you've measured your windows and decided how big you want the curtains, measure out how much you need from the fabric.

Another consideration before you start cutting is how you want to attach the curtains to the rods. If you use Clip on Rings, you just need to sew a straight panel. Loops or tabs that extend beyond the curtain panel are another approach, and you'll need to consider how to incorporate those into the top of your curtain (a great tutorial for that is here: https://www.onlinefabricstore.com/makersmill/how-to-make-tab-top-curtains/). A fairly straight-forward approach is to leave the sides of your top stich open and put the rod through the entire thing - that's a rod pocket design. For my hack, I made loops or tabs but hid them behind the top of the curtains so they aren't visible from the front.

You'll want to give yourself at least four inches on the bottom and at least two inches on the top, plus and inch or two on both sides (so make sure to double whatever you choose for the sides). Cut the fabric into the rough size panels.
When you get  fabric from Spoonflower, you'll have some white borders around the design. You'll want to trim this off.

For reference, the windows I'm covering span a total of 62" across, and 70" tall. Hanging just above them and reaching close to the ground, the 96" length was the look I opted for.

Step 2: Sew the sides of the panels

Using an iron and pins, fold each side of each panel down about an inch, and iron that seam to make it nice and crisp. The experts recommend you fold the fabric over once more and do that again, however, my hack got away with just one fold on each side.

Curtains are great sewing projects because they involve a lot of straight stiches. Once you have your sides pinned and ironed down (pin optional, but I preferred it given the bulky material and sheer length of the hem), simply sew as straight as you can along the fabric fold. Truth be told, if you're worried about  getting this absolutely straight, I'd advice not to stress to much. The finished product is so much bigger than these small lines, that it will be hard to notice minor flaws like that from afar - and most of your guests won't be examining the stitch lines along every seam - I hope.

Step 3: Make the loops / tabs and sew the top

Again, this part will vary depending on which style you want. I used some of the white border fabric, and cut 10 evenly sized strips about 5 inches long and 2 inches wide. They don't have to be perfect, in my hack.

Taking the top of the panel and folding it down a couple inches, just as you did on the sides but with a little more length, I also pinned the loops down so that the tops of the loops were just below the fold. After pinning and ironing all of that, I again just sewed a straight line across, making sure that the loops were straight as I got to them.

Step 4: Pin and sew the bottom

Since in my hack I winged it a little bit, decided to get the bottom length just right, I would hang the curtains to see just how much to fold. So I hung the curtains, selected the length and pinned them right there while they were still hanging. Then I brought them back to my craft room and ironed that fold as before, adding additional pins. While I did this for both panels, it may be most important to do this on the second one, to make sure it lines up with the first.

After ironing and sewing, the final sewing begins, once again straight across, like an old pro by now.

Step 5: Hang the final curtains gloriously and admire your work

With the tab arrangement I used, simply sliding them onto the curtain rod made them look a little frumpy, but it was an easy adjustment to get the top of the curtains to stand up right. Additionally, I adjusted and played with the pleats to make them hang right. In the end, none of the hack choices I made seemed to show or make much of a difference. The bright, bold yellow makes a real statement in the gray room, and I'm darn happy about it.


Monday, September 21, 2020

DIY How To: It's Sew Easy Pillows

Throw pillows are one of the easiest and most obvious ways to incorporate a fun pattern, color and texture into a room, especially a living room or bedroom. Staying consistent with my decorating theory, I recommend making large throw pillows with big, bold graphics and colors. Go for size over quantity, they'll be easier to manage, less likely to fall all over the place, and have a bigger visual impact. In fact, I tend to oversize my throw pillows for this reason.

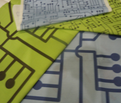
If you're buying custom fabric, like from Spoonflower, for example, there are lots of choices of the actual texture / fabric type. If you want something durable that could go outside, I'd go for a canvas fabric. If you want something super soft, go with a Jersey or Minky. I love the pillows I've made with it, and even intricate designs print really well on the fabric. For this project, I'll use a custom printed design on Minky!

Step 1: Buy the material
For two rectangular pillows, you'll want at least 1 yard of material. If you want to go bigger, you'll need to get a few to several yards. Square or rectangular pillows are "sew easy" because you barely have to design or cut anything.


Step 2: Halve the material (a number of times)
Cut the fabric in half to get the two pillows, and cut it in half again if you're going for more than two. Then, cut the fabrics in half one more time so you have the two sides of the pillows.


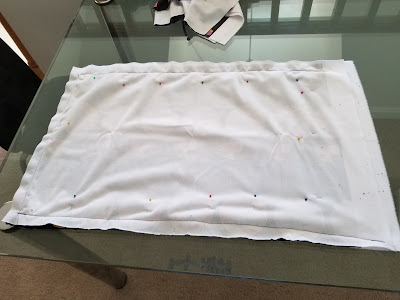
Step 3: Place and pin
Take the two sides of the pillows and place them with the patterns facing in to each other, and align the edges. While it doesn't have to be perfect, you do want to make the edges and corners align as best as possible, because this will maximize your pillow size and minimize rework in your sewing process. Now take your pins and place them through both sheets, perpendicular to the direction of the edge.


Step 4: Sew 3 3/4 edges
I would definitely recommend using a sewing machine, as it will make this process much quicker, although it is possible to sew by hand. Place the corner of the fabrics under the needle and lower the foot to hold the fabric in place. Make sure you have enough fabric hanging over the other side of the needle so that the edges don't get loose. I was taught to sew forwards and backwards a couple times at the start and stop, to make sure the thread is secure. Sew along the edge, making sure you have both fabrics still as you go along. When you get to the next corner, lower the needle through the fabric, then raise the foot on the sewing machine. Rotate the fabric around the needle so you can continue sewing along the next edge. Lower the foot again, and continue along the edge. Leave a few inches open on the last edge (and again, I would sew in reverse and forward a couple times to secure the thread). Remove the fabric from the machine and cut the excess threads.


Step 5: Flip it
You've basically now sewn the pillow inside-out, so that the ugly part of the seams will be on the inside of the pillow. Pull the fabric through the opening to flip it inside out. If you've left only a very small hole, this may take some time to pull through. You can use a pen or the eraser end of a pencil to help push fabric through the hole.


Make sure you push the corners out as far as they'll go.


Step 6: Fill it
Stuff the pillow with polyester filling you can find at craft stores, making sure to work it through to the far corners first, and then filling it up as much as you'd like. Fuller pillows are generally preferable to flimsy pillows, so make sure you have more than enough filling. (That's Carly-Dog in the picture giving me moral support!)


Step 7: Complete the edge
When you're satisfied with your filling, sew the last part of the open end shut by hand. Then, throw it at your favorite person or pup to celebrate your throw pillow! Last part is not required, but highly recommended!


Step 8 (Optional): Add some flair
You can add buttons to the center of the pillows for a classic look, or add some frills or faux fur or some other kind of accent to two or four of the outside edges.

If you want to add some interest to your pillows, you can use a pattern on one side and a plain color or another matching pattern on the other side. The only trick with this is that you'll just have to ensure the fabric pieces are the same size, as some fabrics come in different widths than others.


Not Sew Easy Pillows
For a little bit more of a challenge but also more unique end products, try sewing a cylindrical pillow. You'll need two evenly-sized circles of fabric and then a rectangle of fabric that matches the circumference of the circles. Sew the circles onto the rectangle first, and then the horizontal seam.

Depending on what theme you're going for, you may have a desire to try a shape other than square or rectangular.  For example, a Moana-themed room may have a triangular throw pillow representing the iconic sail. Or you may want to use a plain fabric to make an abstract shape of a rocket, a magic lamp, a rose, a top hat, etc., and then use an iron-on to print onto the center of the front of the pillow.

Maybe you want to add a pocket to a pillow, in which case you'd want to do that on the fabric before constructing the pillow. This might be cute for a pillow representing Woody's shirt, for example.


Saturday, September 28, 2019

Halloween DIY Decorations

Halloween can take many themes and feelings.  It can be downright scary, or it can be fun and silly.  Your Halloween décor may involve spider webs, bats and ghosts, or it may hint at axe murderers, villainous vampires or mummies.  So the drop-dead awesome DIY projects you can use may be limited to the way you want to haunt, err, decorate your home.  Here are some ideas you'll shriek for.
 

Broomstick Way


Use a collection of old, dusty brooms to line your driveway or walkway.  Turn the broomsticks upside down and stick the end a few inches into the ground to secure them.  The broomsticks can be painted or decorated in orange lights, fake spider webs, or both.
 

Halloween is in the Air


Hang ghastly decorations in trees and off your roof or anything else that's tall.  Use fishing string to hang your decorations so they appear to be floating.

Ghosts can be made from old white pillow cases stuffed with batting, newspaper or grocery bags.  Make the head of the ghost by stuffing the center and then pulling it tight with a rubber band or elastic hair tie.  The bottom can be cut up to make a more whispy appearance.  You can also take these ghosts and prop them up on broom sticks (with the broom part removed) around the yard.

To make bats or spiders, use balls of newspaper secured with duct tape and spray painted black, orange, purple or green as desired.  Pipe cleaner, bent metal hangers or paperclips can be used to form the bat wings or spider legs.  For additional thickness, use aluminum foil or paper wrapped around the legs or wings, and spray paint them as well.
 

Pumpkin Patches


Use large garbage bags full of stuffing, and spray paint them orange to make large, round pumpkins (if you can find orange garbage bags, even better).  You can also paint a face on them with black to make them look like jack-o-lanterns.  Or you might try illuminating them with lights on the inside of the bag, pressed up against the outside of the bag.


What Would You Like on Your Tombstone?

Old sheets of wood make for sturdy, re-usable mock graves for a cemetery theme.  You can either prop them up against something (like a tree or boulder) or construct wooden frames to prop them up.  Gray, black and white paint can be used to make a gloomy, stone like façade.  Then use stencils or stamps with black paint to write your epitaphs and add decorative scrolls and designs.  You can either write RIP in large letters, or add funny or realistic epitaphs.


Here are some real epitaphs from Boot Hill in Tombstone, Arizona:
 
Here lies Lester Moore.
Four slugs
From a forty-four.
No Les
No More.

Here lays Butch.
We planted him raw.
He was quick on the trigger
But slow on the draw.

Here lies George Johnson, hanged by mistake 1882.
He was right,
we was wrong,
but we strung him up
and now he's gone.
 

Stranger look as you pass by -
As you are now, so once was I.
As I am now, soon you shall be.
Prepare for death and follow me.

He was young
He was fair
But the Injuns
Raised his hair


Here are some funny ideas if you want to add some humor to your Halloween decorations, but many, many more can be
found on the Internet.

I told you I was sick.

Rest in Pieces

She always said her feet were killing her

but nobody believed her.

Bad to the Bones

He was Dead Serious


For more craft and design hacks, check out my book, Design Hacks for Disney Themed Rooms!

https://www.amazon.com/dp/B084H5SK33

Thursday, September 3, 2015

DIY: Cinch Bags

Cinch bags are super easy-to-make accessories that are surprisingly handy.  I keep my small beauty care items, like chapstick, tweezers, and hair bands, in my cinch bag so they don't get lost in my purse.  Cinch bags can be made for gifts with a personal touch, or for easy fundraisers that also develop sewing skills.  I like to make my cinch bags with different but complementary fabric patterns.  You can make them with as much personality, or as simple, as you want. 
 
  
Materials needed:
Four (4) 8" x 8" pieces of fabric
1 1/2' parachute string or thin ropes
Pins, thread, scissors and general sewing supplies


1.  Start with four pieces of fabric cut to 8" x 8".  Test swatches from Spoonflower are great for this purpose.  You can also pick up small cuts of fabrics at your local craft or sewing supply store. 

2.  Decide which pieces you want to go on the outside and which you want to go on the inside.  Put one inside fabric and one outside fabric back to back and line them up. 

3.  Pin the two fabrics together.   


4.  Start sewing the first edge starting about 1 1/2" down from the top.  Sew the complete bottom edge, and the back up the other side up to the same point (about 1 1/2" from the top).  


5.  Sew two lines across the top, leaving about 1/2" in between and some room on the top.  This is where the string or rope will go through later, and the fabric on top will be the ruffles.  

6.  Repeat steps 2 - 5 with your other pair of fabrics.  

7.  Now, pair up the fabrics so that the patterns you want on the outside are on the inside and vice-versa.  You will sew the bag inside out and then flip it so that the seams are on the inside.  

8.  Sew around the two sides and the bottom, but not the top.  Then turn the bag inside out.  

9.  Tape the end of the string to the end of a pencil, and use it to thread the string through the channels you made at the top.  You'll want one string to connect on each side.  


10.  When both strings are through both sides of the bag, tie the loose ends together.  Pull the knots in opposite directions, and check out your work!  


Here are some combinations of fabrics to inspire you!  

Pumpkin carving 


Thanksgiving and football


Technically Speaking
My circuit patterns are very popular, with lots of sizes and colors to choose from!


Jurassic Patterns


Check out my other fabric patterns for even more!


Want more neat crafts and easy hacks? Check out my book on Amazon Kindle! 

Design Hacks for Disney Themed Rooms