Showing posts with label disney bounding. Show all posts

Sunday, September 29, 2019

Disney World Skyliner: A Modern Take on an Old Favorite

Our red Pirates of the Caribbean-wrapped gondola
If you follow Disney World happenings, you'll probably be aware that the new flying gondola system for getting from select resorts to two of the parks, aptly named the Skyliner, opened today. They are colorful, and many are wrapped with cartoon depictions of some of our favorite Disney characters (even if the characters aren't cartoons in their movies, for example Pirates of the Caribbean). While it would have been ever so convenient if they had opened at the start of our Disney World trip on Friday, we were lucky enough to be able to at least experience the inaugural flights this morning before leaving Orlando.
First off, I think the landscape view is much improved with the whimsical, colorful gondolas dotting the skyline. It adds a modern twist on a retro idea, a nod to the Skyway of Disneyland past, and
Skyliner over Hour Glass Lake
just makes the world of Disney World that much more adorable. Even while they were still running in test mode throughout the weekend, and for the press on Saturday, it was fun to see them soaring through the sky. These are not the rickety gondolas of old, to be sure; they speed along at a pretty brisk pace, which is quite lovely to see from the ground and from within a gondola. The speed also aids in the passive cooling of the gondolas, as the breeze is the primary means of keeping the glass boxes cool. I do wonder how effective this will be on really hot and stuffy days, but it was comfortable even around 10:30 am today, when it was pretty hot outside otherwise. 

Location, Location, Location

Jaiman and I departing Art of Animation Resort Hotel
One of the biggest plusses, in my opinion, is the precise locations of the stations. While most other transportation stations are off in the distance and require lengthy walks to and from, whether you're parking and walking to the tram and then walking to the parks, or going from the hotel shuttle to the ferry. We had, perhaps, the best room in the World for the purpose of riding the Skyliner to a park: Finding Nemo Building 5 at the Art of Animation Resort. Our room, 5513, was at the very end of the hallway, which made for quite a walk to the parking lot, but the shortest walk possible to the gondolas. Like, literally, there isn't a hotel room closer as far as I could tell, at least not at that hotel. It was probably less than 100 yards walking distance from my bed to the loading zone. I'm telling you, it doesn't get any better than that!

Directions from Caribbean Beach "hub"
Currently, all the gondolas go to and from a hub at Caribbean Beach, where you have to unload and then get in a queue for whichever one you want to go on next. We left from the Art of Animation Resort and then took a left turn at the hub to go to Hollywood Studios. The location of the endpoint there is very close to the park entrance; probably just as close as the parking lot tram dropoff point, but you don't have to walk the distance from your car to the tram. We do a lot of walking in the parks, so any way we can minimize the walking to and from the parks is a big plus to me! 

Operations

My inaugural flight, over Hour Glass Lake
I first headed out on my inaugural ride around 7:30 am Sunday morning (opening day), even though they opened at 5:45 that morning (I was tired, so I slept in). At that time, there was no line, which I was a little surprised about, assuming that they'd be all the rage and every Disney fan would be out to give them a go. But I will be the last person on earth to complain about the lack of a line, so I was happy to hop on with no wait. Before doing so, I asked one of the cast members how long the ride was, and he informed me it was about 5 minutes to the Caribbean Beach midpoint, and then about 10 minutes from there to Epcot and Hollywood Studios (at least I think that's what he said, it was early, to be fair). After thanking the cast member for the info, a random passerby showed me his phone with the stopwatch app on it and indicated it had taken 8 minutes and 55 seconds for a round trip. I thanked him for the info, and hopped on.

Skyliner gondolas zipping along

While the gondolas crawl along in the loading and unloading zones, they speed up in the air, and soar at a pretty brisk pace. The acceleration is quite comfortable though. On approaching the unloading zone, the gondola slows fairly abruptly, but again, still at a comfortable rate. My first ride went off without a hitch, and when I landed at the hub, there were a several groups of people milling about, but no lines at any of the outbound lines. I noted that there are separate loading zones for people who need extra time, such as in wheelchairs. Those gondolas, once loaded, are seamlessly incorporated into the rest of the line, and does not stop the flow during loading. With no lines at this point, I got my own private gondola on both trips.

On the way back, however, I did get stopped over Hour Glass Lake for probably 1 - 2 minutes with no explanation. Then an announcement came over the intercom that our ride would continue shortly, and the gondola slowly started moving, inching at first and easing into full speed before coming to the semi-abrupt slow at the unloading point.

View through wrapped window of line to/from Studios
When Jaiman joined me for a slightly extended adventure, it was about 9:45 am when we departed Art of Animation and there was a short line at our loading zone. But, as expected, the line went quickly and we were on our way to the hub. We were loaded in with a few other people, which was still perfectly comfortable with plenty of room to spread out and separate ourselves.
When we arrived and unloaded at the hub, there were lots of people in queues at all three lines. The longest line by far was for Epcot. Cast members were plentiful and announcing helpful directions, guiding people towards the correct queues for each destination. We took a left turn and joined the line to go to Hollywood Studios, since Jaiman wanted to check out some Annual Passholders merchandise he thought would be there. 


Heading to Studios, unwrapped gondola
There was some clumsiness here; as there were two queues available but only one being used. A cast member helped out by trying to guide half the line towards the second queue, but the people directly in front of us were completely in their own world and not paying attention, so Jaiman and I jumped ahead and bypassed nearly half the queue by going to the front of the second queue. Here, I observed the cast member pulling from the two different queues in an uneven manner, favoring the first queue. This may have been intentional because the second queue was newly formed, but obviously would be a problem if the two queues are utilized consistently in the future. Nevertheless, we again joined another small party in a gondola, and we were off! This was the first gondola I rode in that was not wrapped with animated characters, and the difference was certainly noticeable; the view and the photos were much clearer through the unwrapped glass, since we didn't have the dotted graphics hindering the view. 

After going through security at the park, and our short shopping trip, we returned to the Skyliner and joined the queue to head back to the hub. The line
Selfie with our red Pirates gondola
was a bit longer, but again, it went quickly. I had observed that most of my rides thus far had been in yellow gondolas, which wasn't a surprise because it seemed the yellow ones were probably 60-70% of the total gondolas, and this one was orange which wasn't all that different. I joked that my goal was to ride until we got a cool color. We joined the queue to head back to our resort, and lucked out with a fun red gondola wrapped in a Pirates of the Caribbean theme. Because the queue was short here, we were allowed our own gondola again. Over Hour Glass Lake, we slowed substantially, but did not stop this time, and then the same announcement came over the intercom that the ride would continue, and we sped back up the full speed and until approaching the unloading zone again. 

Human Factors

Loading was easy enough. The gondolas slow to an easy pace in the loading zone, and passengers have time to load if done with at least a basic sense of expediency. I could foresee some "GP" moments, which stands for General Public and which I designate when people are creating difficulty by being overly naive, unaware or argumentative. In my six one-way trips, I was stopped or slowed twice, and while I don't actually know the causes of those delays, I think it is more likely due to GP moments rather than technical issues, although anything could happen on opening day, right?

As mentioned earlier, the acceleration after loading and deceleration before unloading were rapid, but not so much that they would be uncomfortable or might cause someone to fall (as long as everyone is staying seated, as instructed). It could be a problem for rulebreakers who decide to stand.

The gondolas have two wood benches, parallel to the direction of entering, and look quite nice and were perfectly comfortable for the short trips. Also as mentioned earlier, the passive cooling of the breeze strategically flowed in kept the gondolas at a comfortable temperature in our limited experience, but I don't have enough data to have the confidence that they will always be sufficiently cool.

The most glaring concern I have from a human factors perspective is that there are no mounted handlebars to hold onto. Because the gondolas are still moving, albeit at a slower pace, at the point of unloading, and because the doors aren't so wide, I could see people running into the door or looking for something to grab onto. I do believe this is a small safety hazard that simple grab bars in strategic locations could alleviate completely. My legs and feet were very sore from the 28 miles I had walked in the previous two days, and as a result, I wasn't the most stable and may have bumped and/or grazed the side of the door as I exited at least of the 6 times I exited. When people start drinking, like say at the Epcot Food and Wine Festival, and then make their way back via gondola, door bumps are inevitable. 


Additional Information

To ride the Skyliner, you do not need a ticket, Magic Band or form of payment or anything. They are free and there is no security line or bag check or anything like that. Of course, the benefits of the Skyliner are most obvious when you're actually using them for transportation to and from the parks and resorts, but if all you want is to ride, it won't cost you anything except perhaps the price of parking wherever you choose to access the gondolas from. 


Conclusion

TTFN, Skyliner!
All in all, I'm pleasantly surprised and excited for the Skyliner's opening. It adds that much more reason to stay on-property, reduces some of the very painful walking to and from the parks, and is a fun and whimsical way to travel to the parks. However, the convenience may be, at least for the next year or so, lessened by interested joyriders fattening up the queues. Only time will tell if, in the long run, the location and speed of this new mode of transport will outweigh the wait time of the queues. I think they will be successful in providing one more convenient way to get people in and out of the parks, and will reduce the demand on the parking lots, making it that much more convenient for the rest of people who drive in and park. Even if we don't end up using them a lot, they are 100% additive to the beauty and whimsy of the Disney World Resort landscape. I do believe, however, that handle bars are going to be a necessary add as guests struggle to exit the semi-narrow doors while moving. 


Want to bring Disney into your home? Check out my book on Amazon Kindle! 

Design Hacks for Disney Themed Rooms
 

Sunday, February 17, 2019

DIY Moana Sail Purse/Bag

A couple years ago, Jaiman and I decided we should try to move to Florida to be close to Disney World so we could go regularly. I was extremely lucky to land a wonderful full time job in Florida which I started in July 2018, and now that we're here, we've started going to Disney World roughly once a month.

While we both have some fantastic Disney shirts, he suggested a month or two ago that we start Disneybounding. If you're not familiar with the concept, it's basically a "lighter" version of cosplay, where you essentially just wear the colors and not necessarily the exact costume of your favorite Disney character. This actually opens up a lot of really interesting and creative directions, and you can find a ton of ideas if you search online.

Needtheless to say, we started looking for what characters we'd want to do, and I targeted Moana, because, well, she's awesome. I had pretty much what I needed already in terms of clothes, a burnt-redish shirt, khaki capris, and even
a bright turquoise gem necklace. But my bag selection was lacking. And the colors themselves didn't necessarily scream Moana like I hoped they would.

So, I was inspired to create something that would be a little more literal Moana, and came up with the idea of making a sail-shaped purse. I spent a lot of time getting the fabric design just right, but luckily for you, this work is now done and you can simply purchase it! This was my first pass at making a purse or bag of this type, and I'm pretty happy with the results.

Below are the details of my project for anyone else who may want to make something similar. I will also add, this fabric would make for great sail-shaped pillows too!

Materials needed:

Tribal Sail fabric (I used 2 yards of Modern Jersey fabric, order it here: https://www.spoonflower.com/designs/8441542-tribal-sail-001-by-lowa84)
Pins
Thread (any neutral color is fine, I used white)
Cotton cord (I used https://www.amazon.com/gp/product/B0728K3QJ4/)
Sewing machine (I used https://www.amazon.com/gp/product/B003VWXZKG/)
Fabric scissors
Black marker

(Optional) Chiweiner or other lovable pet to cheer you on (Carly is always trying to get in my pictures!)


Time: 2 - 2.5 hours


Skill level: Basic


Instructions:

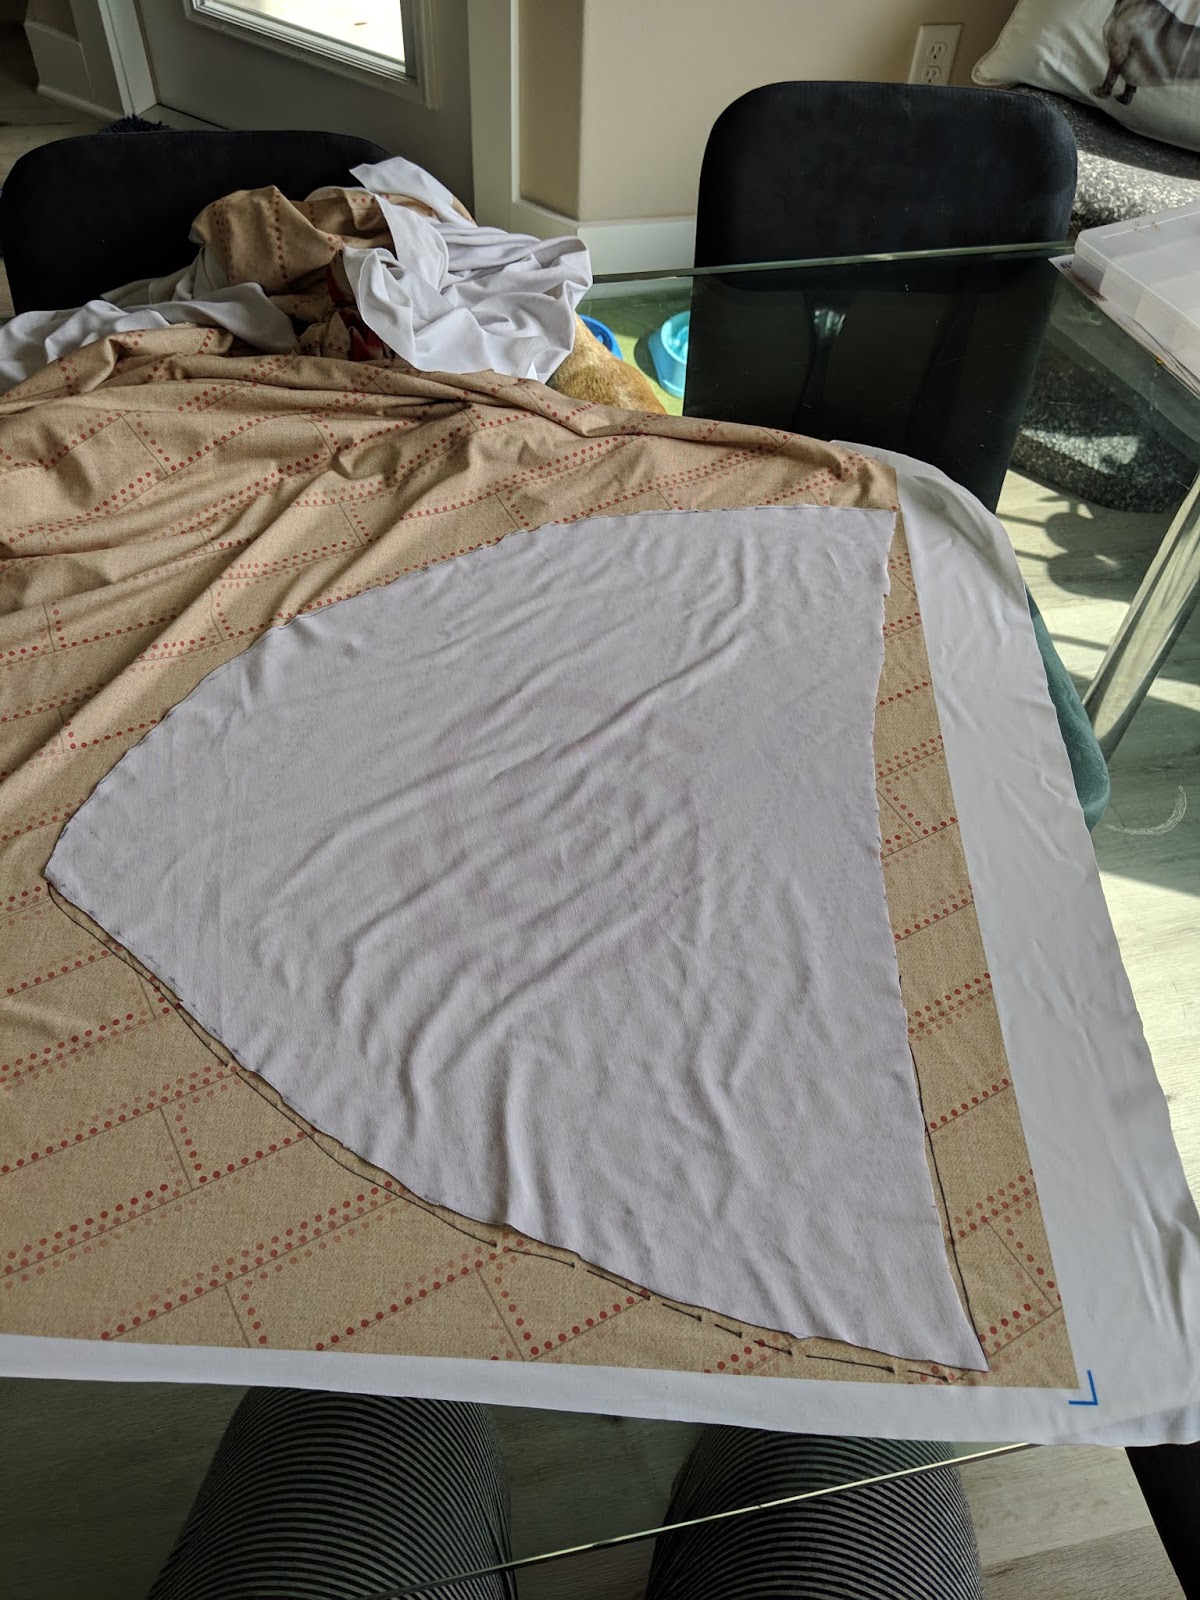
1 - Lay the fabric out on a flat surface with the spiral pattern centered. Imagine and then draw a large sail shape with the marker. Make it about half an inch in each direction larger than you need it, since you will be sewing seams on each side. 

2 - Use fabric scissors to cut along the sail shape you've drawn. The cuts don't have to be perfect, because you'll end up hiding the cut edges on the inside of the purse.

3 - Find another section of fabric with the spiral pattern and flatten it out with the spiral pattern centered again. Take your first cutout and lay it upside down so that the two faces of the pattern are together. This is to make a symmetrical copy. Trace around the edge of the upside down piece. 


4 - Use fabric scissors to cut along the sail shape you've traced.

5 - Lay the pieces together so that the faces are towards each other and you are seeing the white underside. Line up the edges and pin them. 


6 - Take the cotton cord, measure and cut one piece double the length of the top of the shape with a little extra slack. 


7 - Tie the two ends of the cord together and place along the knotted end on top of the fabric.

8 - For each side of the purse, wrap the top edge of the fabric around the cord and pin. 


9 - Sew the seams at the top of each piece holding the cord in place.


10 - Sew the other two edges of the fabrics together, just like you would if sewing a pillow. You sew them with their patterns facing each other so that when you're done, you'll flip them inside out and the seam (and messy cut edges) are on the inside, and the outside looks clean. Helpful tip: When you get to the end of the first edge and you want to turn the corner, make sure the needle is in the fabric (manually roll it if needed) and then lift the foot, adjust the fabric and then set the foot back down. This gives you a continuous thread and ensures you don't have any gaps. 


11 - Once both edges are sewn together and all pins are removed, flip the fabric inside out through the open edge. 


12 - To make the purse strap, cut a long straight strip of fabric, however long and thick as you'd like. Make sure to make it a little more than twice as thick as you want the final strap to be. The cut doesn't have to be perfect, since you'll end up hiding the cut edges on the inside again.


13 - Fold the strip of fabric in half and pin. Then sew along the open edge. 


14 - Flip the strip inside out. It will take some working from both ends. 


15 - Cut additional cord to run the length of the strip plus some additional slack.


16 - Run the cord through the strip to the other end so you have some cord handing out of each side. Helpful tip: You can use a permanent marker or pen with a clip on the cap to wrap some cord around it and then use the marker/pen to edge through the fabric strip. 


17 - Tie both sides of the cord in the fabric strip to the cord going around the rim of the purse. Make sure it's the length you want, and trim/adjust the cord and/or fabric strip or tie additional knots as needed to get the desired length.

18 - Once properly adjusted, sew the bottom of the strip on both sides to the rim of the purse. 


19 - Show off your handiwork! Feel free to post pictures on my facebook page at: https://www.facebook.com/deziwheel/ I'd love to see what you've done!  


Get the guide

Sign up with your email below to join my writing journey, and I'll instantly send a printable guide for this project straight to your inbox: 


Get inspired

Want to bring Disney into your home? Check out my book on Amazon Kindle! 

Design Hacks for Disney Themed Rooms