Showing posts with label how to. Show all posts

Sunday, July 3, 2022

How To: Lego Mural

My house is a Lego house. Not literally, but only because we haven't built our dream house yet (which will most definitely incorporate a Lego feature). Anyways, we have a lot of Lego sets and MOCs (My Own Creations). Since we eat dinner on the couch primarily, we don't have a functional need for our dining room. So I'm transforming our sad pastel old-person dining room into a Lego Gallery. Before I get the furniture and textiles, I'm painting the walls and adding a couple murals. I thought I'd take you along and provide some tips for those wanting to do something similar.

Pre-work: Choose your design. I had my friends on social media vote on my mural design, and the consensus was between options 3 & 4. Feel free to take inspiration from any of these designs! 


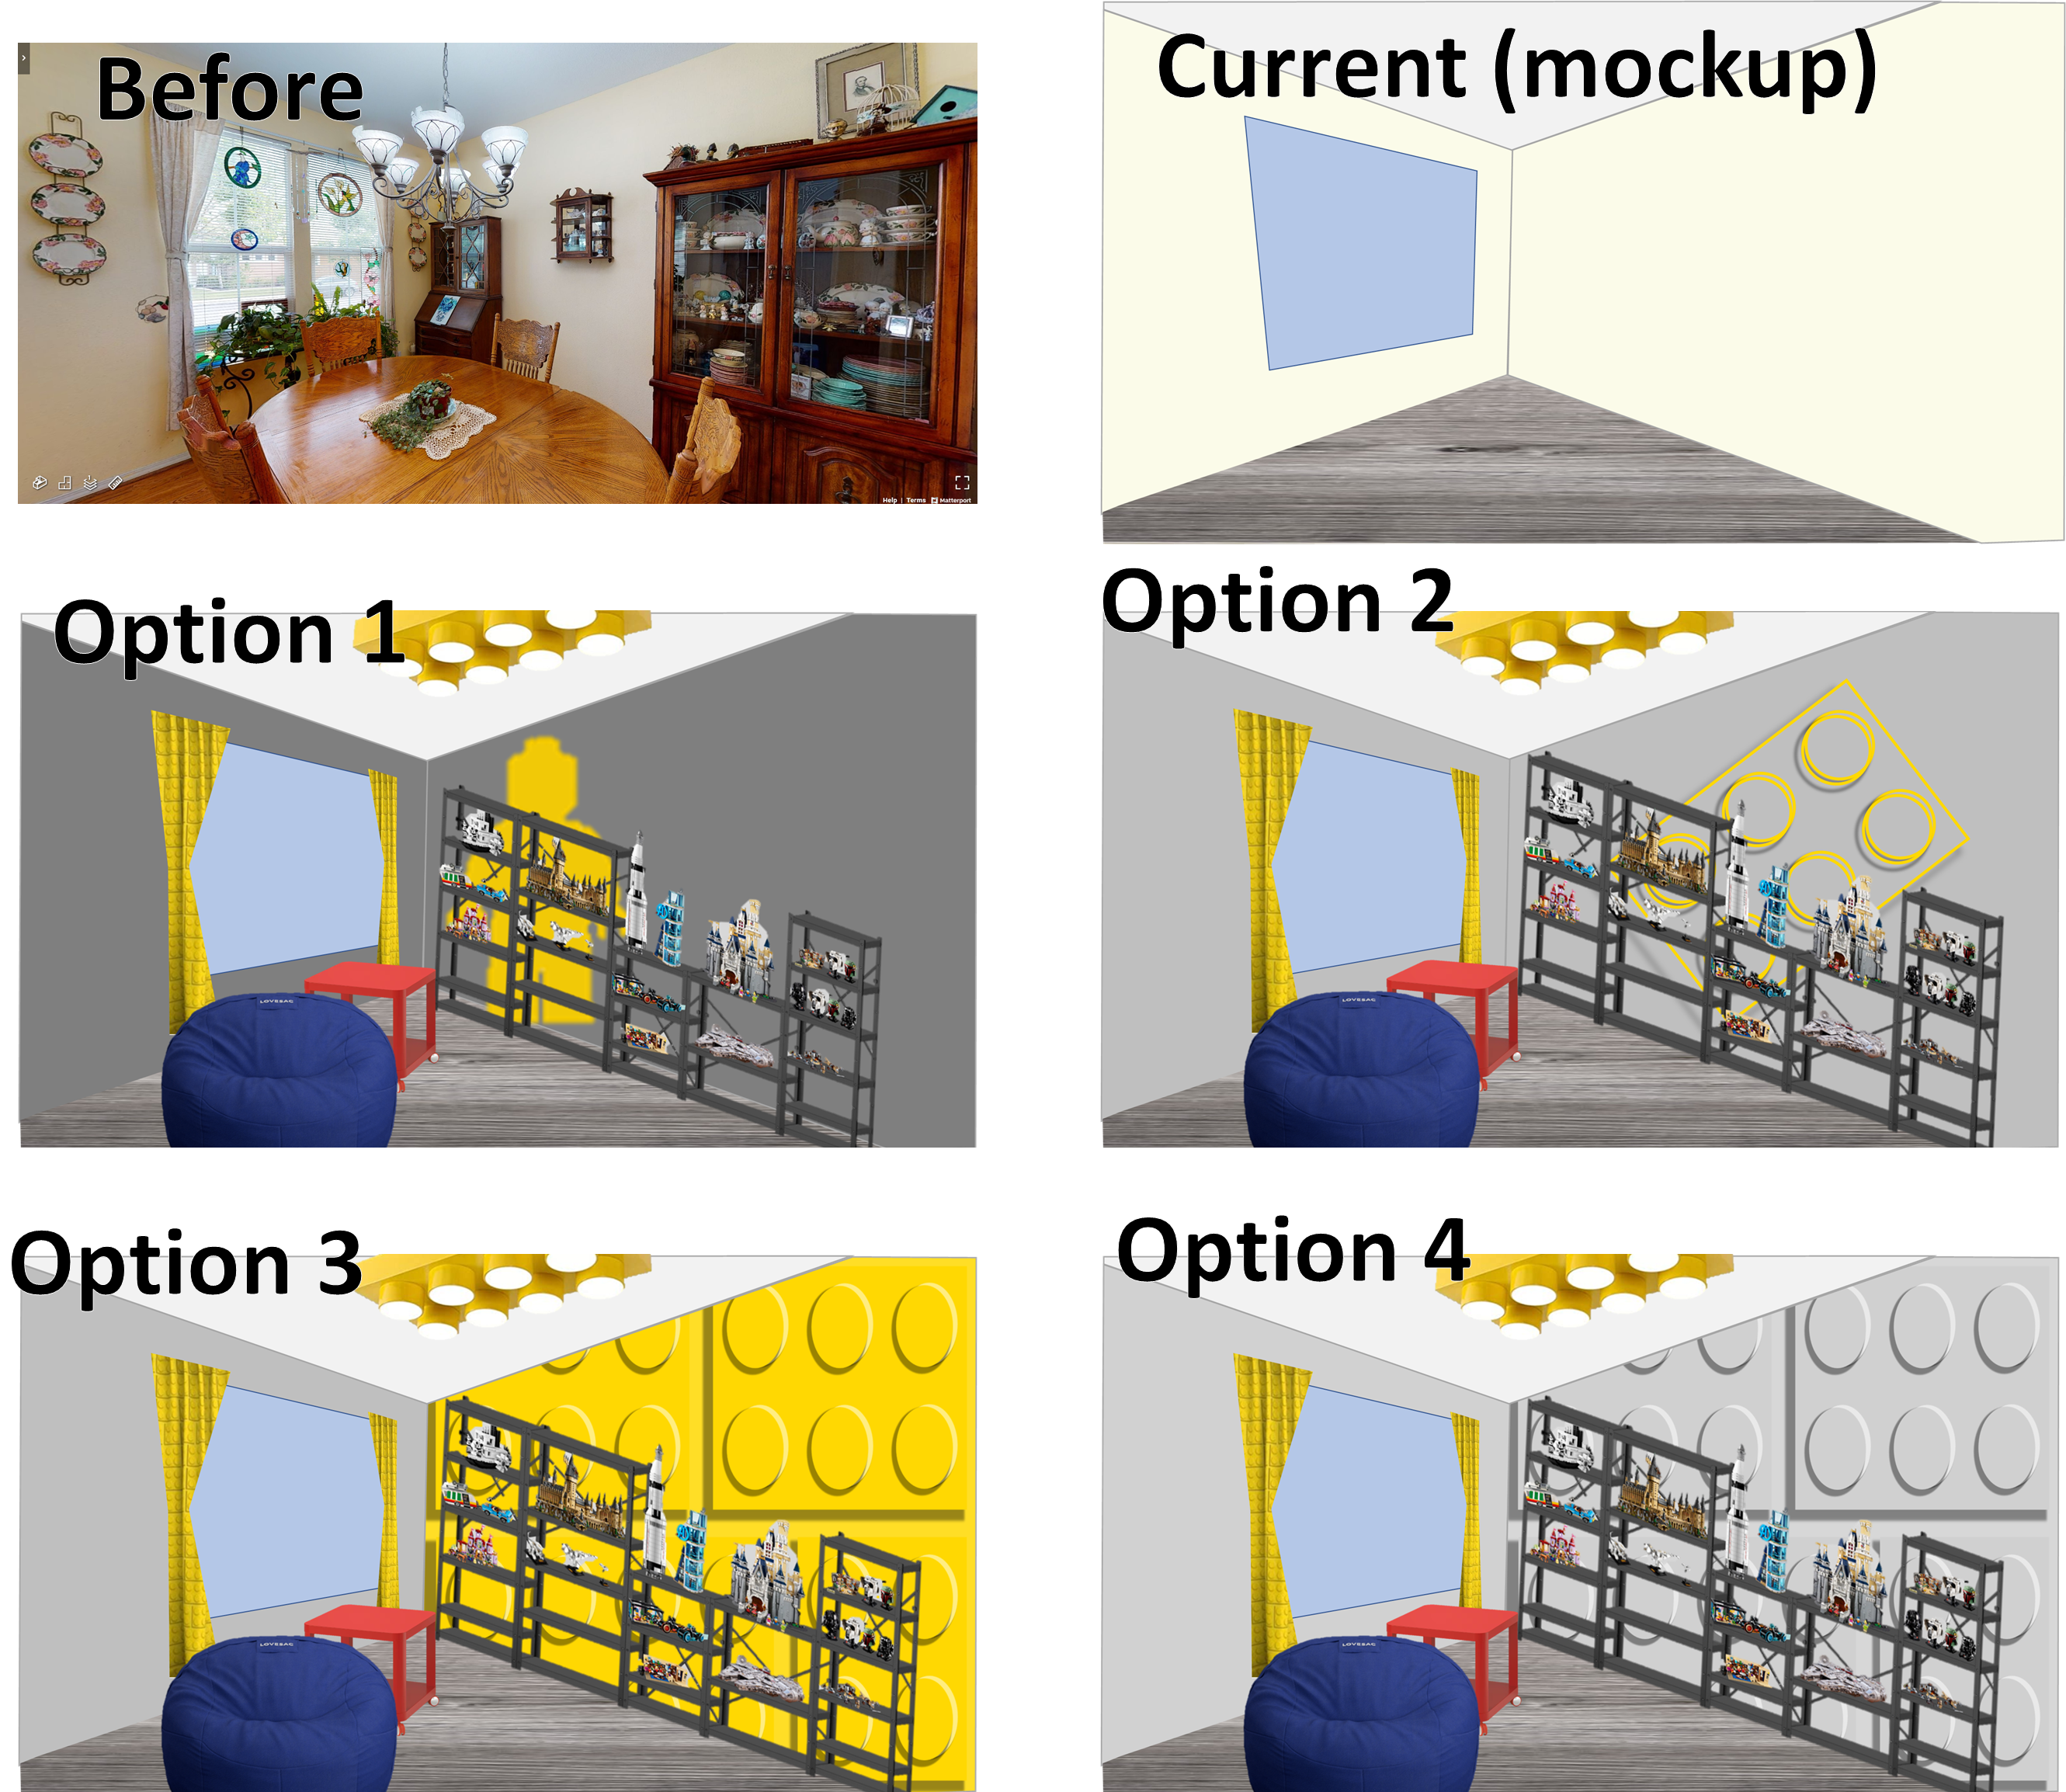
I plan to put a shelving unit for a Lego gallery in front of the wall, so I thought the yellow would be too distracting. Thus, I selected the gray design.

The key to this mural is that the base color is the same as the brick color and the top of the studs. So in all reality, after the base coat is up, all I'm going to paint are the highlights and the shadows. It's a negative space trick! Neat, huh?


How to Paint this Lego Mural

Step 1: Paint the base color. I actually brought to Home Depot a giant Lego block to do an exact color match (more precisely, I brought the gray Lego wall hanger). For the shadow I needed a darker gray, and I used a swatch that went well with my lighter gray color. I had white paint lying around, so planned to use that for the highlight color (later, I decided  that the white was too stark, so I mixed some of it with the wall color).

Step 2: Cut a pizza pan-shaped circle in an old Lego box. The mosaic kits are great square boxes for this purpose. I'll refer to mine as Marilynizza (you'll see why later).

Step 3: Measure Marilynizza, representing the size of the stud, and then determine relative dimensions, including room for shadows and highlights. These are rough dimensions I measured by using PowerPoint (because I'm a weird nerd and use PowerPoint for all visuals).


Step 4: Tape a grid on the wall. Notice it's not a perfect grid throughout. I've made room in between my "bricks", as indicated by the green tape. I started with the bottom to make sure I had my technique down, and also because I got tired of taping and wanted to dive into the painting!


Step 5: Line up the bottom and left edges of the taped square with Marilynizza.


Step 6: Trace the outside left and bottom. With paint. Specifically, a darker shade than the base coat, to create the illusion of a shadow. A smaller, artistic brush, is recommended for this.


Step 7: Slide Marilynizza over and fill in the gap with the shadow-colored paint. Just for fun, the color of the wet paint in the darker grey looks almost exactly like the dry color of the lighter grey, making an additional challenge in ensuring coverage. The good news, shadows can be a little fuzzy, so it's okay if it's a little imperfect.


Step 8: Remove Marilynizza and watch the paint dry. Just kidding! You have a million more studs to do, keep going! 

Pro Tip: I noticed the paint started getting on the back of Marilynizza and then transferring to the next part of the wall where I didn't want it, so I started wiping the paint off the back of her after each "stud" was complete.

Step 9: After the paint has sufficiently dried, use the other side of Marilynizza to paint the highlights of the studs. Line her up with the top and right edges of the box for the first trace in a lighter color or white, then slide her over and fill it in, just like before! 

Pro Tip: Once the tape is up, painting the crescent shapes for the stud shadows and highlights went pretty fast. For the upper ones, I needed an extra pair of hands so my love supported by holding the paint while I was up on the step ladder with my Marilynizza and paintbrush. For studs at height, definitely a good idea to have a partner to help you out! 


Step 10: Remove the tape for the stud sections, and put any more tape down as needed to line out the shadows of the Lego bricks. 

Step 11: Paint the shadows in the darker color. (This also goes quite quick. I was too excited so I forgot to take a picture of the tape before painting.)


Step 12: After the paint dries, remove your tape and do any touch-ups as you see necessary.


Step 12.5: Enjoy your new mural! Or, immediately cover it up with all your more intricate Lego builds! 

I am thrilled with how the mural turned out! Even with some imperfect measurements I noticed half way through the project, I think the objective of the vision was achieved. My technique was certainly inconsistent from stud to stud, repeated over 28 times on both sides, but none of those details really show when you look at the broader picture. 

Stay tuned (and subscribe) to see how the Lego Gallery room comes together. Lights, curtains, furniture, and of course, the Lego sets and MOCs, still to come! 

Next up: Lego curtains!

Saturday, January 4, 2014

What the (Maker) World Needs Now

Is Love.  Newbie Love.  It's the only thing that there's just too little of.  


I've been involved on a pretty remotely basis in the maker world for a couple years; knowing about events, visiting little shows, taking TechShop classes, and even trying a few times to make something myself with tools outside my comfort zone.  Many of my friends and family have seen me build things like headboards and hamper benches, and create presents like glass etched ornaments, and they probably see me as more creative and wacky than most people they know.  Yet to me, I have barely skimmed the surface of what it is to be a maker, and in some ways am paralyzed by the overwhelming slurry of things to learn and what to do first and who to talk to.  I envy the people with a single passion, because they know what they want and can throw themselves into it.  I have such an eclectic variety of interests that I tend to lack focus and accomplish nothing while I aspire to do so much. 


Within the context of that background, here is my perspective on the maker world today. 

  1. The maker community is strong and vibrant, especially in major hubs like San Fran and Orange County, but even here in the Phoenix area.  
  2.  There are lots of hackerspaces, fab labs and makerspaces open and available to the public.  You don't need to own a single tool to make something amazing.
  3. New makers tend to be paralyzed by the unknown, the overplanning and the fear of looking stupid. 
  4. There is a lot of advice out there (books, lectures, articles, you name it) saying that the best thing to do is just start.  This is really key to the move from dreamer to maker; if you know what you want to do, just start. 
  5. There are a lot of entrepreneurial resources available, if you know where to look. 
  6. Dreamers have a lot of ideas, and technology is enabling all of us to come out with new ideas, vet them out, and experiment without ever pouring money into them.
  7. Websites like etsy enable a global marketplace to purchase homemade products.
All of this spells out a fantastic, nearly ideal, environment for makers, and its only getting better.  However, there are some pretty big hurdles to overcome as a new maker, and I think there are things the maker community could do better to ease those hurdles and create more makers (which is good for everybody).  Here are the hurdles I see, and how to address them:
#1:  More (or ANY) Marketing!!
In a world in which we're practically inundated with advertisements, I see next to nothing promoting makerspaces, hackerspaces, fab labs, co-working spaces or MakerFaires.  I travelled to San Fran to visit TechShop a couple years ago; they had three facilities in the area and were well established, yet I met tinkerers at the local breweries that had never heard of TechShop.  Most people I talk to in Arizona haven't heard of TechShop, either, which is less surprising I suppose because they are new, but they should have made a big deal about their national chain opening a place in Arizona.  When Ikea opened, people were literally camping outside for days to be the first to enter the new store.  When In-n-Out opened in Tucson, there was a five hour wait in the drive-thru line; Tucsonians could literally drive to Phoenix, buy the In-n-Out there which had only a normal line, drive home, and eat their food before getting through the line at Tucson.  I'm picking on TechShop a bit here, but it's the tough love kind of picking on:  I wrote countless emails begging them to give me more information about the opening, with the promise that I would help promote the heck out of it.  Yet I first learned it was open when I just so happened to visit their website one day to check on the status.  I'm on the subscriber list of their newsletters, and I didn't even see the Chandler opening announced in those.  Come on guys, you could do better.  I know marketing isn't one of the typical primary strengths of inventors and tinkerers, so hire someone to do it for you if needed.  Heck, I'd do it part-time in exchange for a free membership, and still do a better job. 

TechShop aside, I think all of the events and various spaces could and really SHOULD do a better job in this department.  When there's a hot new chain restaurant in town, the earliest people to go in are the people who are familiar with it from another location.  Many more people will hear about it four or five times from various people before going in themselves.   Recommendations from multiple sources make the unfamiliar less daunting, and gives people assurance that it will be a good experience.  But let's say someone heard of HeatSync or Gangplank just once, and thought it was a cool concept and wanted to check it out, if they don't hear about it again, you've probably lost them. 

To me, all of these places exist in a secret underworld that I am privy to the knowledge of.  That's not the right place to be.  To foster and grow the Maker community, we need Making to be a normal activity.  Maybe not as everyday as grocery shopping, but certainly as common as going to a football game or musical.  It needs to be something that people are aware of, so that people who take interest in making will actually get up and go.

#2:  Make Your Own _______  Workshops

A lot of people are crafty in nature, but need ideas and support to do the "doing".  These are perhaps not the target audience to transform into makers, but I think a subset of them are wanna-be makers paralyzed in the first stages of starting, and this would offer a comfortable environment to bloom in.  Look at As You Wish, which is more of a commercialized, formulated making process, but is so mainstream I'd guess that everyone around knows what they are.  They have strategic placing near movie theaters, and the window displays are so fun, relevant and inviting that it gets people going in.  People know that if they want to make a ceramic dish or ornament, they can go there and do it with confidence.  I've taken glass blowing workshops in which we made flowers and Christmas ornaments.  They were short time commitments, just a couple hours, and had a definitive end result: a piece of glass art that I created that can be picked up in a day or two after it cools down.  I think that is the key to drawing in a greater population, and some of those will "stick" and become truly independent makers, freed from the initial paralyzing move and armed with confidence, contacts and a tiny bit of know-how. 

#3:  Formalized Volunteer Mentoring Programs
Let's walk a day in the life of a wanna-be maker: she heard about a cool hackerspace, has a basic understanding of what materials could be manipulated with which tools, and perhaps has done some crafty projects at home or at a workshop.  She still has no idea what project to dive into, but wants to dive into something.  She walks into the hackerspace she heard about, and nobody looks up.  There is no front desk to sign into or ask for help, and there are no clear directions.  There are groups of people working on various things together, and their energy is exciting, but she does not want to interrupt them.  She looks in awe at a Makerbot whizzing away on a part, but doesn't want to linger too long.  She assumes she should sit and work on something, and maybe someone will come talk to her.  So she finds an empty chair and sets up her laptop, and starts programming, or attempting to anyways.  She's stuck.  She continues to look around and nobody even seems to know she's there.  An hour goes by.  She packs up and leaves.  Where was that collaborative maker community?  What was it that she was supposed to do?  How can she get involved?  She thought she would find these questions by coming, and now they are even bigger question marks.  This was me not too long ago, and it might have turned me off completely if I wasn't so freaking determined to get out of my job any way possible. 

Now let's imagine a mentor or leader was there on her first day.  She walks in, and the leader was working on something, but sees her as a new face and hops over to greet her.  He asks her what she is interested in doing, and she explains little bit of her skill set but that she has no specific project in mind and would like to help.  He says that's great, and introduces her to a mentor who is working on a project.  The mentor then explains his project and what's left to be done on it, and asks if she would be interested in helping.  She is excited, and accepts, and he starts going over the project in more detail, and then shows her what he's working on next.  They spend an hour or two together, then he asks her if she would be willing to attend an upcoming class or do some research on a particular subject that will be needed for the next phase.  She agrees, and now has something to focus on that is contributing to someone else's project.  Her hands-on experience will help her start her own project soon after, and she eventually becomes a mentor herself. 

It doesn't have to be a grandiose system; in fact it would be silly for such a thing to exist in the Maker world, what with its grass-roots hacking kind of culture.  But I think there should be someone who greets newbies, and helps them get going in the right direction.  And there should be a list somewhere of mentors around the shop that are willing to take someone on.  And I think all of this should be free.  Some places have Dream Coaches or Dream Consultants that are paid to walk you through the steps of your project, and those are fantastic for the right application, but that shouldn't be the only means of gaining supervised experienced. 

#4 Maker Showcases
There are art galleries and craft fairs today, but they hold a kind of folksy feel to them.  And yes, I know there are MakerFaires and MiniMakerFaires, but those are big blowout type events and only happen once a year in a given location.  Maybe I need to go to a few to know for sure, but I think there's something missing that is somewhere in between craft fairs and MakerFaires, and perhaps it does exist but I don't know about it therefore it has failed in my #1 issue and thus doesn't exist to me.  It can be a bit like an open house from gradeschool, where the parents come in and see what the students have done so far.  Or like a science fair or robot competition.  There were these cool opportunities for some kids growing up, and I wish I had more of those opportunities myself, but once we become adults those things seem to disappear.  I would love to have a showcase that ran every night for a week, where all the makers who wanted to participate could show off their projects, in whatever state they are in, and people could come and talk with them and learn more.  It would be a great way for my family to come visit and see what I'm up to, as well as to inspire dreamers to become new makers.  It's a local thing, not a giant convention, and it's more tech-driven than a craft fair.


#5 Full Circle Processes
One of the fabulous classes I took at TechShop during my San Fran trip was the injection molding class.  We each got a turn to load the plastic beads, and shoot the mold full of hot, gooey plastic and see the results in the form of a cute little plastic gear emulating TechShop's logo.  However, I learned in the class that making a mold is really complex, and I knew from past entrepreneurial aspirations that having a mold made is quite expensive, to the tune of $2000 or more.  What I felt was missing, and still to this day, was a mold design class.  I mean, we have all of these neat CNC machines and 3D printers, why no teach us proper mold design so that we can put them to use to make our own molds, and then allow us to cast or use injection molding from that?  What's more, I've had a terribly difficult time finding resources or classes on moldmaking, and so I've made it a personal goal to learn everything I can from the limited resources that exist.  And I think this speaks to a greater problem, that we have all of these individual tools but there isn't a lot of coherent connections between each skill. I'm sure I have long since forgotten how to use the injection molding machine, but even if I practiced for weeks with that cute little gear mold, it wouldn't help me make anything else. 


All in all, I see the Maker world teeming with potential, but it is still an underground, secret society to most people.  That intimidation paired with the how-to-start paralyzing effect on wanna-be's will probably keep it that way.  And maybe that's what they want, deep down; maybe they want a community comprised only of die-hards who were persistent enough to break through those barriers.  But my guess is that they want the community to grow, to be more accessible, the excite and inspire more people who are not as persistent, and I think the major steps above would get them(/us?) there.